Showing posts with label Summer. Show all posts

Summer Fest Part 2 with a clafoutis

By Mélanie, on Monday, August 10, 2009

web1

Today, we are celebrating two events :

- I am happy to announce that the "baby sister" of this blog is created! As I told you, this new blog is not at all about culinary experiences. I've often regretted not to know the city I live in better. So I'm going to visit Paris, take pictures, and every day, photo by photo, you'll be able to visit with me. During the week-ends, it will be more relaxing with beautiful sceneries of the French countryside, that my friend Claire will be sharing with you. The blog's name is Country and the City, and I hope you'll visit regularly. Tell us if you like it!

- Back to the kitchen, and this is the second week of the Summer Fest 2009. This event is "a four-week celebration of fresh-from-the-garden food: recipes, growing tips, even tricks for storing and preserving summer’s best".
The co-creators of this event are : Maragret from A Way to Garden, Matt Armendariz of Mattbites, Jaden Hair of Steamy Kitchen, and Todd and Diane of White on Rice Couple, with guest appearances from Shauna and Daniel Ahern of Gluten-Free Girl, Simmer Till Done’s Marilyn Pollack Naron, and Paige Smith Orloff of The Sister Project.


This week is (almost was, as, once again, I'm waiting for the last days to finally post these!!)dedicated to stone fruit.

web3

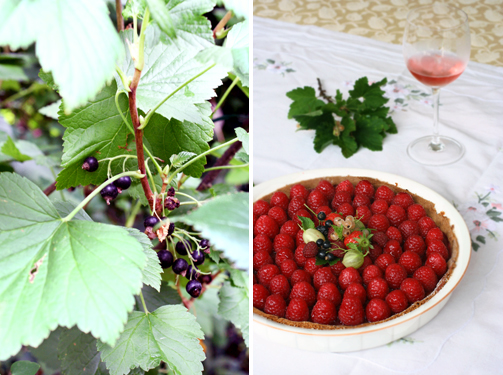
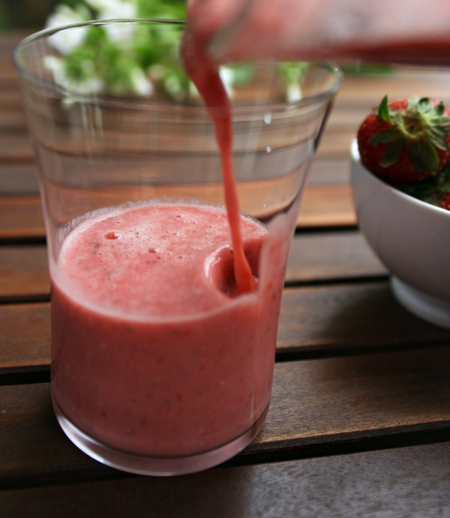
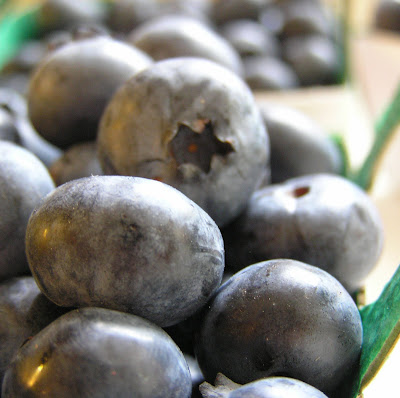
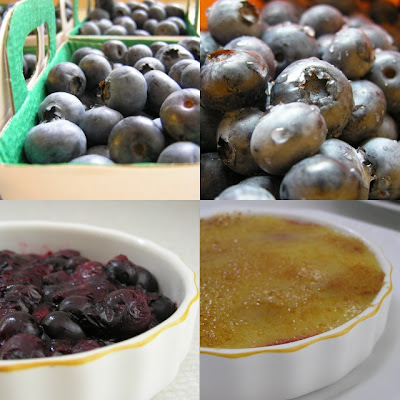
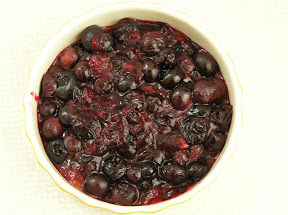
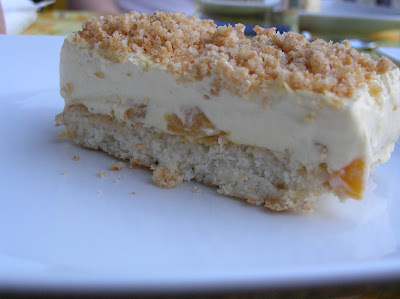
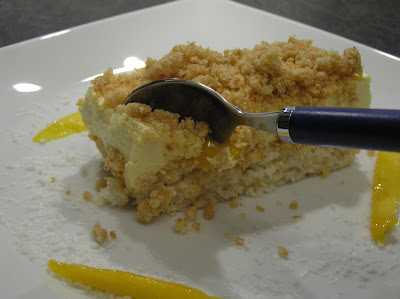
Now, I'm not sure cherries are considered as stone fruits... I've never heard of a "stone fruit" category in France, but they have stone, they are in trees, so I hope it's right... At least there are some peaches in the recipe too.

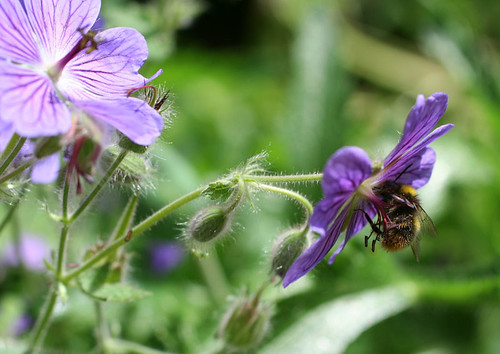
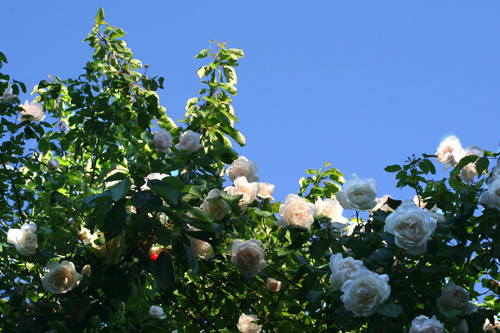
In our garden, we have had difficulties with stone fruits. I love spring time, when the apricot tree and the cherry tree are blossoming. They have these small pale pink and white flowers, and when the wind blows, it looks like it's snowing. Just for that, it is worth having them. But, as you can see, our cherry tree is not very prolific. The roses climbing in the tree is much more!

web2

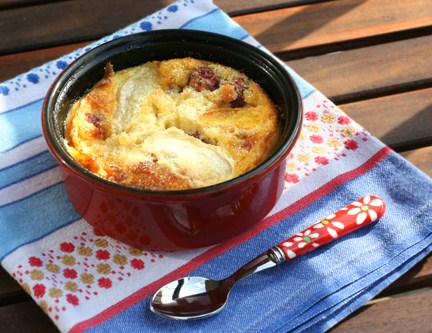
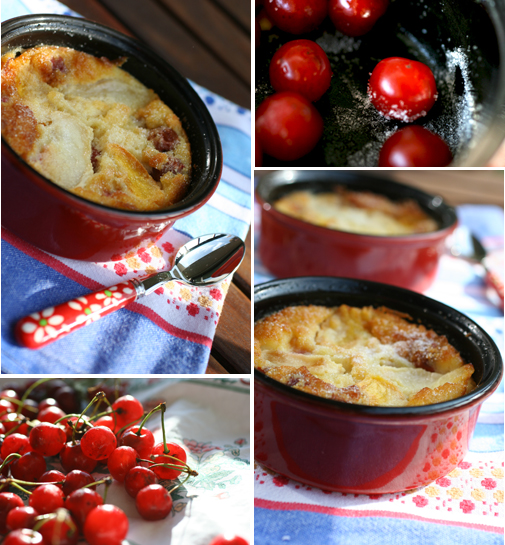
Fortunately, our local producer has lots of cherries, including Montmorency cherries, which are more on the sour side than the regular ones. They are perfect to include in this almond clafoutis.

web4

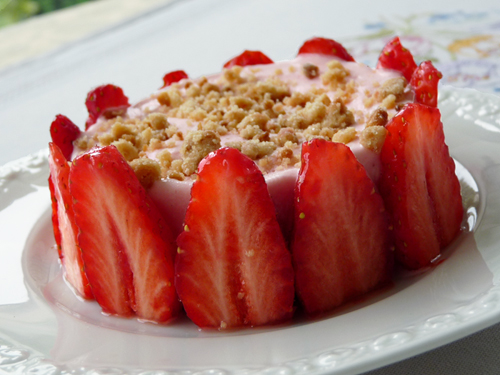
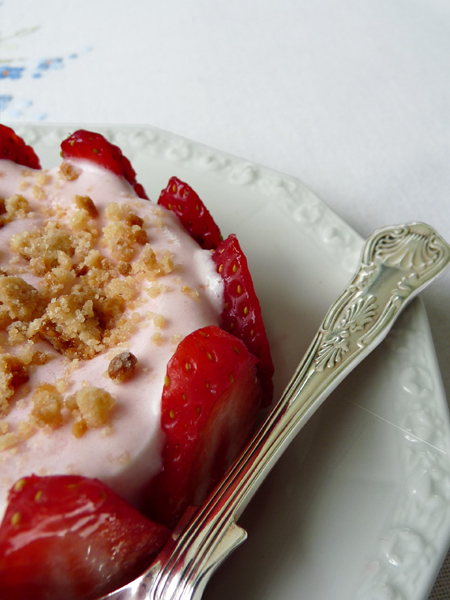
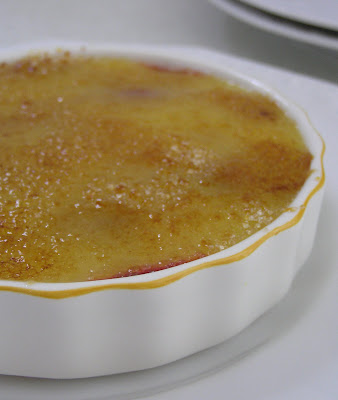
Summer fruit clafoutis
For 4 individual clafoutis

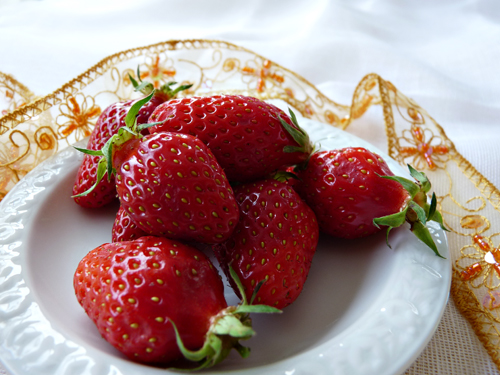
1 pound summer fruits (cherries, apricots, peaches...)
2 eggs
3 Tbsp butter, melted
1/2 cup milk
1/2 cup whipping cream
1/4 cup sugar + 2 Tbsp
3 Tbsp flour or cornstarch
1/3 cup almond flour
1/2 tsp vanilla extract

Grease the 4 ramekins with butter and sprinkle with a tablespoon sugar. Arrange the fruits inside.
Preheat oven to 350°F.
In a bowl, mix together the eggs with the sugar and the vanilla extract. Add eggs and butter. Add and mix in half flour, then cream. Add remaining flour and milk. Make sure there are no lump.
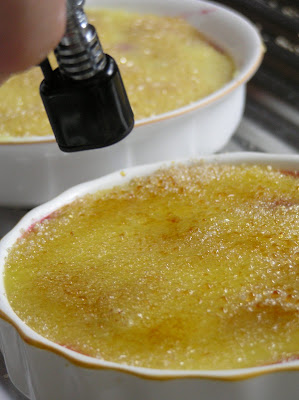
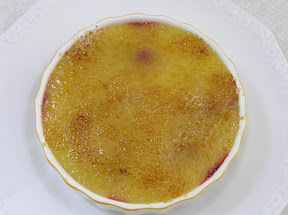
Pour on the fruits and bake for 40 minutes. Five minutes before the ending, sprinkle with the remaining tablespoon sugar.
Serve warm or at room temperature.

Clafoutis aux fruits d'été
Pour 4 clafoutis

500g de fruits (cerises, abricots, prunes, pêches)
2 oeufs
35g de beurre fondu
13 cl de lait
13 cl de crème liquide
50g de sucre + 2 cuillères à soupe
20g de farine ou de maizena
60g d'amandes en poudre
1/2 cuillère d'extrait naturel de vanille

Beurrez 4 ramequins et saupoudrez avec une cuillère de sucre. Disposez les fruits dans ces 4 plats.
Préchauffez le four à 180°.
Dans une jatte, fouettez les oeufs avec le sucre et la vanille. Ajoutez les amandes en poudre et le beurre, puis alternez avec la farine, le lait et la crème en mélangeant à chaque fois pour éviter la formation de grumeaux.
Versez cet appareil sur les fruits et faites cuire 40 minutes. Cinq minutes avant la fin de la cuisson, saupoudrez d'une dernière cuillère de sucre.
Servez tiède ou à température ambiante.
La suite, please

Mint & Strawberries in the simplest apparel

By Mélanie, on Tuesday, August 4, 2009

fraises3


This second recipe is a little late for the summer fest week. We're now talking about stone fruits, so I'm off subject here. But maybe you have a prolific mint like me & my mother do. Or maybe you bought a bunch for a recipe and you're left with a handful of leaves, no knowing what to do next. Well, here I am with the solution!
Ain't I nice?

pâte sucrée
you'd better say yes, have you seen this rolling pin?

This recipe is, once again, very simple to assemble. This is all about summer, and the last thing we want is to spend a whole sunny day inside, cooking... It's time to rest, to go to the beach or to discover the parks of your city. It's also time to enjoy the bright simplicity of fruits. Just a sablée crust and mint will make the sweet flavors of ripe strawberries stand out. There's no need for cream. No, I said no pastry cream. No whipped cream. Don't insist. I had doubts too. Then I tasted it. No doubts anymore. You can do it.

fraises2


About the tart crust : this is the fourth recipe on my blog. Whatever the recipe, please make it yourself and don't use a store-bought one. It's really easy, there's no reason to be afraid. Don't hesitate to put a lot of flour on your kitchen counter before rolling it. And if it breaks, it ok, just press it together in your pie form. There is NO comparaison between a store-bought crust and a homemade...

fraise1


Strawberry and mint tart

For the sugar crust
1 egg
1/3 cup + 1 Tbsp sugar
1 1/2 cup flour
1 stick butter
1 pinch salt

For the tart
1 1/2 pound strawberries
15 mint leaves
2 Tbsp currant jelly

First mix sugar, flour, salt and the butter for a few seconds. Mix in the egg and, with your hand palm, press the dough about 3 times, just until it forms a ball that holds together. Flatten into a disk and wrap in plastic wrap and refrigerate at least 1 hour and up to 1 day.
Preheat oven to 340°F.
Roll out dough into a on a floured surface with a floured rolling pin. Delicately fold the rolled dough in 4, to lift it easily, and unfold in the tart form. Prick bottoms all over with a fork and bake 15 minutes.

Once the crust cooled, arrange diced strawberries on top, in a concentric form.
In a small saucepan, heat the jelly with 1 Tbps water until liquid. Brush the strawberries with the jelly.
Slice thinly the mint leaves, and sprinkle over the pie.


Tarte aux fraises et à la menthe

Pour la pâte sucrée
1 oeuf
100g de beurre
200g de farine
80g de sucre
1 pincée de sel

Pour la tarte
700g de fraises
2 cuillères à soupe de gelée de groseilles
une quinzaine de feuilles de menthe

Mélangez quelques secondes le sucre, la farine, le sel et le beurre, le temps de former une pâte grumeleuse. Incorporez l'œuf. Fraisez (c’est l’action de travailler avec la paume de la main) rapidement et formez 1 boule de pâte. Aplatissez et enveloppez ce disque dans un film plastique pour reposer au frais pendant au moins 1 heures.
Préchauffez le four à 170°.
Farinez abondamment le plan de travail ainsi que le rouleau à pâtisserie, puis étalez la pâte sur 2 à 3 mm d'épaisseur. Pliez délicatement la pate en 4 pour la soulever plus facilement et depliez là dans le moule à tarte. Mettez à cuire 15 minutes.

Une fois le fond de tarte refroidi, arrangez les fraises coupées en lamelles de manière concentrique.
Dans une petite casserole, faites fondre la gelée avec un peu d'eau, et appliquez ce nappage sur les fraises.
Emincez finement la menthe, et disposez la sur la tarte.


La suite, please

Last call for summer fest

By Mélanie, on Monday, August 3, 2009

tastespotting

You know this feeling, when you're rushing through the airport, running and hoping you'll get in time before the plane takes off? The adrenaline is pumping, but deep down you know that you can make it, that, no matter how tired you are, it's going to be alright. You won't give up.
Well, that exactly how I feel right now. It's 2 a.m. in Paris and I want to post this recipe before the end of the day (US time. no, it's not cheating). To my regret, I have not participated to a lot of blog events (one, actually), but when I saw that Todd and Diane, of White on Rice Couple, collaborated to the Summer Fest 2009, I knew I wanted to be part of this.

geranium petit

This event is "a four-week celebration of fresh-from-the-garden food: recipes, growing tips, even tricks for storing and preserving summer’s best". Some people may think that they are not concerned because they live in an apartment. But if you have even a windowsill, you can have some fresh aromatic herbs at home.

web1

Because I grew up in a house with a garden, filled with stone fruits trees (apricots, peaches, cherries), berries, tomatoes, zucchini, and herbs (and LOTS of flowers...), this is something I really missed when moving to Paris.
Fortunately, I have now a balcony, and my first plantation was for a little corner of kitchen delights : rosemary, thyme, basil, etc...

thyme

But the easiest herb to grow is mint. It's almost like weeds, appearing in every corner of my jardinière. If you don't want this, you should plant it in a separate part. I don't mind though, because i really enjoy its fresh and peppery flavor during the summer. It will make a huge difference in a simple fruit salad, but really, when it's hot outside, you can just add it to anything!
I'm going to post a few (and sooo easy) recipes with mint to give you some ideas... There was the strawberry and watermelon smoothie.
This is a chilled cucumber soup, perfect as an appetizer, with some friends on a warm evening.

web3


Chilled mint and cucumber soup with shrimps
For 4 appetizers

1 large cucumber
1 yogurt or 1/2 cup buttermilk
10 mint leaves, washed
1 teaspoon salt
12 shrimps, cooked

In a blender purée cucumber and mint with buttermilk and salt until smooth (I start with one third of the cucumber and all the buttermilk, and then I add gradually the rest, so that the cucumber doesn't get stuck in my blender). Keep in refrigerator. Before serving, add 3 shrimps in each bowl.
Served chilled.

Soupe froide de concombre à la menthe
Pour 4 entrées

1 concombre
1 yaourt brassé
10 feuilles de menthe, lavées
1 large pincée de sel
12 crevettes cuites

Réduisez le concombre, la menthe, le sel et le yaourt en purée dans votre blender / mixeur (je commencer toujours par hacher 1/3 du concombre avant d'ajouter le reste, sinon tout se coince entre les lames du robot). Gardez au réfrigerateur.
Avant de servir, ajoutez 3 crevettes dans chaque bol.
Servez bien froid.

La suite, please

One year! and a Raspberry tart to celebrate

By Mélanie, on Saturday, July 25, 2009

tastespotting


One year ago, I started this blog. Like for a baby, this first year was mainly about learning. I needed understand about how to write, about the importance of plating and composing, about CSS (still not great!!), etc...

Even though I have still so much room to improve, I feel there has been some progress. I have enrolled in photoshop classes. I've discovered RSS feeds. I now know how to change the blog layout. I pay much more attention to the light in my photography. I've become familiar with new cooking techniques. I've even sewed a tablecloth (and learned how not to show the twisted hem in picture ;-)

web5

I am happy I had the occasion to learn all of this. And I'm very excited about the future steps! One of them is the blog remodeling, and I wished I had finished it today. I did try, but, boy, am I slow when it comes to "!-- #.a hover@ dd: exp }". Do this looks like swears words to you too?

However, I have one big news. I'm glad to announce that this blog is going to have a baby sister. It's due for this summer. I'm still thinking about names... There's going to be much less talking. No food. But a lot more to see. Can't wait!

web2

For this occasion, I want to share with you a special treat, the quintessence of this blog. It represents everything I love in a dessert. It's not too sweet, got plenty of fruits in it, their flavors brightened up by the almonds. This simple tart captures the summer mood.

The gorgeous raspberries are so fresh that it feels like sunshine in your mouth. Their acidity is partialy offset by the rich almond cream, which is layered over a sablée crust. Now do you really wonder why this has always been one of my favorite dessert? I thought I was the only one, but the number of "second"-servings proves me wrong! Although you can find it in almost any bakery in France, I had never prepared one myself. What a better time than a first year anniversary for this?

web4


Almond and Raspberry Tart

1 sablée tart shell
2/3 stick butter
1/2 cup almond flour
1/2 cup sugar
2 eggs
12 oz. raspberries
6 oz. mixed berries (whatever you have)
5 teaspoons sugar
1/2 sheet (1/2 teaspoon) gelatin

For the sablée tart shell, you can use one of these recipe :
- From J. Robuchon, my favorite, the one that has been used in my family for years. It's a little bit more difficult, sticky and has to be rolled thinly (because there is not so much dough). However, once you'll taste it, you'll forget the difficulties.
- From S. Glacier, easier, and tasty enough to compete with the one from Joel Robuchon. But be careful, there's a lot of dough, so it will be enough for a tart + 1 or 2 tartlets.
- The sugar pie crust from P. Hermé. Yields 3 tart shells, so you can freeze 2 and have it ready for another time.

Preheat oven to 350°F with rack in middle.
Roll out dough on a lightly floured surface with a floured rolling pin into a 12-inch round.
Slide bottom of tart pan (separate from rim) under dough and set into rim of tart pan. Cut off excess dough, leaving 1/2-inch overhang, and fold overhang inward. Press dough against side of pan, pushing dough 1/4 inch above rim. Lightly prick bottom of shell all over with a fork and chill until firm, 10 to 15 minutes.
Bake until side is set and edge is pale golden, about 12 minutes.

During that time, prepare the almond cream. Mix together sugar, almond flour and butter. Beat in the eggs.
Pour into the par-baked shell and bake 20 more minutes.
Let cool.

Arrange raspberries over the cooled pie.


In a small bowl, sprinkle the gelatin over the water, and let it sit.
Put remaining berries and sugar in a small saucepan over medium heat until cooked (about 5 minutes). Puree with a fork or in your blender. Pass through a sieve to keep only the juice and mix with gelatin while it's still warm.
Pour over the raspberry tart.

You can decorate with confectioner sugar and mixed berries.


Tarte amandine aux framboises

1 fond de tarte en pâte sablée
70g de beurre à température ambiante
110g de poudre d'amande
90g de sucre
2 oeufs
350g de framboises
170g de fruits rouges (framboises et/ou cassis, groseilles...)
20g de sucre
1/2 feuille de gélatine

Pour la pâte sablée, vous pouvez utiliser une des trois recettes suivantes
- Celle de J. Robuchon, ma préférée, mais la plus difficile à travailler. Elle est fragile et la quantité correspond à un fond de tarte de 24cm, il faut donc l'étaler finement (donc plus de risques de la casser). Ces difficultés sont vite oubliées dès qu'on la goûte.
- Celle de S. Glacier, que j'utilise aussi depuis un an. Elle est tout de même assez bonne pour faire de la concurrence à celle de Joel Robuchon! La quantité n'est pas très pratique, elle correspond à 1 tarte + 1 ou 2 tartelettes...
- Celle de P. Hermé. Il s'agit en fait d'une pâte sucrée. L'avantage est qu'elle correspond à 3 fonds de tarte, vous pouvez donc en congeler 2 et les avoir prêts pour un autre jour.

Préchauffez le four à 180°.

Etalez le disque de pâte en un cercle légèrement plus grand que votre moule à tarte, sur une épaisseur de 2-3 mm. Garnissez votre moule (beurré et fariné) avec la pâte et faites la pré-cuire 12 minutes au four.

Pendant ce temps, préparez la crème amandine :
Dans le bol de votre robot, mélangez le sucre et la poudre d'amande, puis le beurre en morceaux. Incorporez ensuite les oeufs.
Versez l'appareil sur le fond de tarte pré-cuit et enfournez pour 20 minutes.
Laissez refroidir à température ambiante.

Disposez les 350g de framboises sur la tarte.

Faites tremper la demi-feuille de gélatine dans de l'eau froide.
Dans une petite casserole, faites chauffer à feu moyen les fruits rouges avec le sucre pendant environ 5 minutes. Ecrasez-les avec une fourchette ou dans un hachoir, et passez-les à travers un chinois pour ne garder que le jus.
Mélangez le jus avec la gélatine essorée, et versez ce coulis sur les framboises.

Décorez avec du sucre glace et des fruits rouges.
La suite, please

The lovely Frozen Strawberry Pie

By Mélanie, on Monday, July 6, 2009

web1

I know I should be talking about the end of the wedding cake story.
But there's something more urgent first. I want to introduce you to this lovely dessert. It would be such a shame to wait there's definitively no more strawberries to share it with you. Because I really want you to try this pie.

Who knows, maybe it will become a favorite dish in your home too, one that you prepare for birthdays, mother days, or all June long... It will have its own memories attached to it.
Just like an antique dish or furniture, it has many stories to tell, the recipe being passed to friends and family and creating new souvenirs.

web3

I got this recipe from Marsha, my "american mother". When my brother was 16, he decided to spend one year in America. We were happy (and relieved!) to see that he was hosted by this incredibely generous and loving family. Actually, I was lucky too, because it also changed my life. Without him (and them), I don't think I would have cared to do an internship abroad. I learned english to communicate with them. And ten years later, we're still in touch...

Can you imagine that this cake was the first thing I ate in the US? Well, actually, I think the first thing was a half bagel. Then a wonderful chicken salad with strawberries. And then, this! (now I wonder... did Marsha did some research? I was a picky eater then. But strawberries? Always have been my favorites!).

web5

It was nine years ago. We were going to meet the family and to pick up my brother before exploring the West. Is that why I remember everything so precisely? My first impressions in the plane (actually, I was struck by the wide roads. It seemed like cars could park on each side of the road, and that 2 other ones could still cross each other. Even in the residential areas! My parents live in a ruelle. It's wide enough for 1 car. No parking. No crossing. And no huge car!). The first evening. And this pie is like a vessel carrying back all these memories to me.

Now, the vessel has grown larger, because my mother and I love it so much that we have it pretty often. One year we made it almost every Sundays of the summer...
Now that I think of it, it's also the one I made for my friends on the week-end they stayed over, just before our final graduation exams. The cake was great, but the week-end did not turn out exactly as I planned... Umm, here's one advise : don't ever run for the phone when you just got out of the swimming pool! Unless you want to go to the exams with a plaster cast and crutches... And as we were waiting for the ambulance, my friends tried to make me laugh and speak. You know what the best way is : talk about baking! So I actually had to repete this frozen pie recipe almost 10 times in a row. yeap.....

web2

So go make your own memories (maybe not this one!). You need more convincing? Ok.
- It's super easy to prepare (no requirement for an ice maker), and super quick, so you'll have more time to enjoy the sun outside this afternoon
- Well, it is lovely, isn't it? The pinky cream, the crisp crumble... What's not to love?
- We're in July. It's warm. You need something light and refreshing. Like a frozen dessert, don't you think?
- A frozen strawberry sherbet with some walnut crumble? Gah. What are you waiting for?

web4


Frozen Strawberry Pie
From Marsha, who says " This recipe comes from Aunt Helen, my father's only sister (who had to grow up with 5 brothers on the farm) - she had no kids and was always our 'favorite' aunt because she was so nice and spoiled us!!! She was also a very good cook!"

For the dough

1 cup flour
1/4 cup brown sugar
1/2 cup chopped walnuts
1/2 cup butter at room temperature

For the sherbet
2 fresh egg whites
1 pound strawberries
1 cup whipped cream
3/4 cup sugar
2 Tbsp lemon juice

Preheat oven to 350°F.
Butter a 10-inch round cake pan. Line the bottom and sides with parchment or waxed paper.

Place the walnuts in the oven for 5 minutes before chopping them.
In a large bowl, mix together the flour, brown sugar, butter and chopped walnuts with a spoon.
Sprinkle 1/4 cup of this dough on a baking sheet lined with parchment paper.
Gather and press the rest of the dough into a ball, and press on the bottom of the prepared pan.
Bake for 15 to 20 minutes (the crumble will be done before the crust). For the crumble topping, break the big crumbs while they are still warm.

Reserve 2 oz. strawberries for the decoration.
Dice the rest, the puree half of the strawberries.
Beat whites in mixer at medium speed until they form soft peaks*. Add sugar gradually, beating, and continue beating at high speed just until whites are thickened and form stiff peaks.
Add strawberries (dices and puree), lemon juice and whipped cream, and whip until fully incorporated.

Pour on the bottom crust in the round pan and place in the freezer for at least 6 hours. Before serving, apply a spong with hot water against the form and use the waxed paper to remove the pie from the pan. Sprinkle with the crumble and decorate with the remaining strawberries.

* Note : If you are concerned about using raw eggs, you could replace the sugar by a syrup : bring 1 cup sugar and 1 Tbsp water to a boil until it reaches 245°F. Then pour it on the fluffy egg whites while beating slowly. Continue beating at high speed just until whites are thickened and form stiff peaks, then proceed with the strawberries, etc...


Gateau Glacé aux fraises
De Marsha

Pour la pâte
140g de farine
100g de beurre
40g de sucre brun
70g de pralin ou de noix

Pour la crème aux fraises
2 blancs d'oeufs ultra frais
150g de sucre
450g de fraises
25cl de crème liquide
2 cuillères à soupe de jus de citron

Préchauffez le four à 180°.
Beurrez un moule rond de 26 cm de diamètre et tapissez le de papier sulfurisé.

Faites chauffer les noix 5 mn au four avant de les concasser, ou utilisez directement du pralin. Mélangez-le avec une cuillère avec le beurre, le sucre brun et la farine.
Reservez environ une poignée de pâte que vous saupoudrez sur une plaque à patisserie.
Formez une balle avec le reste, et étalez-la au fond du moule rond.
Faites cuire 15 à 20 minutes (attention, le crumble sera prêt avant le fond du gâteau). Si les morceaux de crumble sont trop gros, brisez-les lorsqu'ils sont encore chaud. Laissez refroidir (sans démouler).

Réservez 50g de fraises pour la décoration.
Coupez les 400g restantes en morceaux et réduisez la moitié en purée.
Battez les blancs en neige*, puis versez doucement le sucre en continuant à battre doucement. Augmentez la vitesse jusqu'à ce que les blancs soient fermes et brillants.
Dans un autre saladier, battez la crème liquide en chantilly. Ajoutez-la aux blancs, ainsi que les fraises et le jus de citron.

Versez l'appareil sur le fond dans le moule, et faites prendre au congélateur (au moins 6 heures).
Avant de servir, appliquez une éponge d'eau brulante sur les parois du moule, puis aidez-vous du papier sulfurisé pour le démouler et le placer sur une assiette. Parsemez le dessus de crumble et décorez avec les fraises.

* Si vous n'êtes pas à l'aise avec l'utilisation ddes oeufs non cuits, vous pouvez remplacer le sucre par un sirop : lorsque les blancs sont montés, portez 200g de sucre et 1 cuillère d'eau à ébullition jusqu'à atteindre 120°. Versez le sirop doucement sur les blancs tout en continuant à battre, puis augmentez la vitesse jusqu'à ce que les blancs soient fermes et brillants. Ajoutez ensuite les fraises, etc...

La suite, please

A strawberry watermelon smoothie for a sunday afternoon

By Mélanie, on Saturday, June 13, 2009

smoothie site 2

Tomorrow it's gonna be Sunday. It's going to be a sunny and warm day. Imagine yourself enjoying the nice weather outside. Maybe even having a barbecue, gardening, or just relaxing. You know what would make this day even more perfect? The vibrant taste of strawberries, yes. But, most of all, in the form of a cold and refreshing drink!
So please, go put one yogurt in the freezer now. That's it. Tomorrow, all you'll have to do is to add a handful of strawberries, a piece of watermelon, and some mint leaves to brighten up the flavours. And enjoy!

smoothie site1


Strawberry Watermelon Smoothie

1 yogurt (fat free)
A dozain strawberries
2 oz. watermelon (without the skin)
4 mint leaves

The day before, put the yogurt in the freezer.

Cut the fruits in large cubes, put in the blender with the frozen yogurt and mint. Blend. Serve. Enjoy!

Smoothie aux fraises et à la pastèque

1 yaourt nature (0% par exemple)
Une douzaine de fraises
1 morceau de pastèque (environ 60g sans la peau)
4 feuilles de menthe

La veille, mettez le yaourt au congélateur.

Coupez les fruits en large morceaux, placez les avec le yaourt (brisé en morceaux) et la menthe dans le mixeur. Mexez. Servez. Et appreciez! :)
La suite, please

Bring summer home with a tomato tart

By Mélanie, on Wednesday, June 3, 2009

Sun dried tomatoes

This was a surprise.

Most of the times, I know before starting what's going to be shared with you. The choice is already made, and the experience is very different. I'm thinking of you in the kitchen, and I am paying special attention to the preparation : I take detailed notes and pictures of the different steps, I measure everything, and I try not to be messy.
And believe me, clumsy as I am, this is the hardest part! When I bake, I usually end up with flour and eggs all over the place. Maybe it sounds more real, but it doesn't look good on the pictures! ;-)

Some parmeggiano

After that comes the plating and the testing. This is when I might be torn :
See, sometimes it looks good.
The pictures are nice.
I'd really love to show you the result (especially if I took 25 pictures of it).
Like this one. Pretty thing, isn't it?

don't juge on looks!

But!
The taste doesn't match with the work needed / the look achieved. And I won't tell you how to spend 3 hours in your kitchen for a bla result, won't I?
Yeah, I'm that nice!

Because I'm that nice, I'm also going to tell you about this savory tart I made the other day. It's very simple, and was made in a hurry, before leaving for a party. I was late, and it even finished cooking during the evening, in the turned off oven. I did not care, it was just a way to use my soon-to-be out-of-date mozzarella. But last night, I had a bite of it, and O.M.G.! No way I'm keeping that for myself! Even if I don't have any picture to go along with it...

PS : Next time, I'm going to tell you about what kept me busy since saturday. Non stop (in my head anyway). Let just say it involves some research. A little handycrafts. Lots of butter and sugar. And a super excited me!! I'm doing the last (and most difficult) steps tonight. We'll see if I'm still this happy tomorrow... But the best thing is all the nice bloggers who helped me with the little aléas in my way to buttercream heaven!

before the oven

That's how far it gets with the pictures....

Zucchini, Sun-Dried Tomato, and Mozzarella Tart
Adapted from
Bon Appetit

For the tomatoes (you can substitute them with oil-packed sun-dried tomatoes)
6 small tomatoes or 4 large ones
5 Tbsp olive oil
1 rosemary branch (about 1 Tbsp dried one)
1 thyme branch (about 1-2 Tbsp dried one)
1/2 tsp salt

1 sheet puff pastry (made with butter, please!!)
1 1/2 cups shredded mozzarella cheese
6 Tbsp freshly grated Parmesan cheese
1 tablespoon chopped fresh oregano
1 small zucchini, cut into thin rounds
2 large eggs
1 cup half and half
1/4 teaspoon salt
1/4 teaspoon ground black pepper

Prepare the tomatoes :
Preheat oven to 300°F.
Quarter the tomatoes (or cut in 6 for the large ones). Remove the seeds, you just want to keep a tomato "petal". Put them all in the same way, skin side down, on your baking pan, and drizzle with olive oil. Sprinkle with rosemary, thyme and salt. You could also add a garlic clove.
Roast for 1 to 1 1/2 hours, turning the tomatoes from one side to another every 15-20 minutes.

Raise oven temperature to 400°F.
Transfer pastry to 11-inch tart pan with removable bottom. Fold in overhang to form double-thick sides. Pierce with fork, fill with beans or pie weights. Bake pastry until sides are set, about 20 minutes.

Sprinkle mozzarella over bottom of crust. Top with tomatoes, zucchini rounds in concentric circles to cover top of tart. Whisk eggs, half and half, salt, and pepper in medium bowl. Pour mixture into tart. Sprinkle with Parmesan.

Bake tart until custard is set and crust is golden brown, about 40 minutes. Serve warm or at room temperature.


Quiche aux Tomates confites, Courgettes et Mozzarella
Adapté de
Bon Appetit

Pour les tomates (si vous n'avez pas le temps, achetez des tomates confites à l'huile d'olive) :
6 petites tomates ou 4 grosses
5 bonnes cuillères à soupe d'huile d'olive
1 branche de romarin (environ 1 cuillère de romarin séché)
1 branche de thym (1 à 2 cuillères de thym séché)
1/2 cuillère à café de sel

1 rouleau de pâte feuilletée pré-étalée pur beurre*
1 boule de mozzarella, coupée en petits morceaux
6 bonnes cuillères à soupe de parmesan râpé
1 cuillères à soupe d'origan
1 petite courgettes, coupée en fines rondelles
2 oeufs
12,5 cl de lait
12,5 cl de crème
Sel et poivre

* Après avoir essayé plusieurs marques, la pâte feuilletée de chez Picard arrive loin en tête devant les autres...

Préparez les tomates :
Préchauffez le four à 150°.
Coupez les tomates en 4 quartiers (ou en 6 pour les grosses). Enlevez les pépins et le centre, en ne gardant que la chair extérieure, pour former une sorte de "pétale". Placez les sur la plaque de cuisson, coté coupé vers le haut, et arrosez d'huile d'olive. Ajoutez le thym, le romarin et le sel. Vous pouvez également ajouter une gousse d'ail.
Faites confire les tomates 1h à 1h30, en retournant les pétales toutes les 15-20 minutes.

Augmentez la température du four à 200°.
Foncez le moule avec le disque de pâte feuilletée, piquez le fond avec une fourchette. Faites cuire 20 minutes.

Parsemez le fond de pâte avec la mozzarella, puis disposez les tomates confites et les disques de courgette de manière concentrique.
Mélangez les oeufs, le lait, la crème, l'origan, le sel et le poivre dans un petit bol. Versez cette préparation sur la quiche, et saupoudrez de Parmesan.

Faites cuire 40 minutes, jusqu'à ce que la tarte ait une jolie couleur dorée et soit légèrement gonflée. Servez chaud ou à température ambiante.
La suite, please

Pierre Hermé's blueberry and lemon dessert

By Mélanie, on Tuesday, August 19, 2008

Did I already tell you that I can be a bit monomaniacal ? Well, those last months, I have been a lot. Concerning desserts, my whole world revolves uniquely around Pierre Hermé.
It all started 3 months ago. I was walking home when I had to stop in front of this bookstore. Hum, now I understand why I need 20 more minutes to walk home than I need to go to work : in the evening, the shops are opened…

Anyway, here’s where my other obsession comes in : I tend to buy a lot of cook books. Like, really, a lot. In fact, I’ve almost called this blog “1 meter of recipes”, because it’s actually the length of my bookshelf dedicated to them. Scary, isn’t it? And like the picky girl that I am (yeah, that too…am I not charming?!?;-), it’s not even that I need every book I see. I do make a selection, with recipes tested many times, that requires real cooking, and not adding some blueberries to a pancake mix. Not that it’s wrong, I just don’t see why this is called a “recipe”…

Of course I have not read, and even less tried, half of the recipes. So I decided that, as I have 232 recipes highlighted (which means 232 recipes making me feel very curious. or simply drooling…), I should not buy any other cookbook.
And then, there was the bookstore.
And on display, the book.
On sale.
How could I resist??

Leafing through the book, I was seduced. In the next 3 weeks, I had already baked two of the beautiful cakes. And I was convinced. My grand mother too, who said it was the best cake I’d ever baked. Although they require some time, each step is so clearly explained that it feels simple. And the result is so good it’s definitively worth it.


So hey, can you really blame me for buying two of his other books?

While one is dedicated to chocolate, the other one has a section on summer fruits. Blueberries, peaches, apricots… Can’t you feel the warm summer days just thinking about those? I eat them fresh everyday, but on Sunday lunch there’s a dessert. And I want to use them while it’s still time, before entering the wonderful figs and pear season (ok, so maybe I’m more a fruit than chocolate girl, but don’t tell anyone!).
This is really a summer dessert. It’s lighter (in sensation, maybe not in calories), there’s no oven required. It’s fresh, thanks to the blueberries and the lemon.
If you like lemon tart, you’ll like this dessert. If you like crème brulée, you’ll like it too. And if you like both, you’ll love it! Because the adding of blueberries just makes it even more special… and sophisticated, if you want to serve it for a special occasion.


Blueberries and lemon crème brulée
4 servings

For the blueberries:
17 oz. blueberries
2 ½ cups sugar
Juice of 1 lemon
1 tsp. cardamom

For the lemon cream:
1/3 cup lemon juice
2 eggs
Zest of 1.5 lemons
1/2 cup sugar
1 stick butter

4 tsp. brown sugar

Pour 4 cups of water into a boiling pan with the sugar and the lemon juice. When the water is boiling, cook the blueberries for 2 minutes. Drain and distribute into 4 ramekins.
Let cool 2 hours in the refrigerator. Verify that the blueberries did not lose their juice, otherwise, tilt the ramekins over the sink to drain them.

Prepare the lemon cream. In a big bowl, beat together the eggs, the lemon juice and zest, the sugar.
Place the bowl over a bain marie (a pan of boiling water). Continue to whisk until the mixture thickens and has the consistency of a cream (about 10 minutes). Be careful that it doesn’t boil.
As soon as the cream is ready, change it to a cold bowl, to stop the cooking. Add the butter cut in small pieces. Whisk with the mixer during 10 minutes to obtain a homogeneous consistency.

Cover the blueberries with the lemon cream and leave in the refrigerator for at least 3 hours.

Before serving, sprinkle each ramekin with a teaspoon of brown sugar. Place under hot broiler for 3 minutes until sugar caramelizes. Serve immediately.


Douceur de myrtilles au citron
Pour 4 ramequins

Pour les myrtilles :
500 g de myrtilles
550 g de sucre
1 citron (pour le jus)
1 c. à café de cardamome

Pour la crème de citron :
8 cl de jus de citron
2 œufs
le zeste d’1 citron et demi
110 g de sucre
100 g de beurre

4 cuillères à café de sucre brun


Versez 1 l d'eau dans une grande casserole avec le sucre et le jus de citron. Lorsque l'eau bout, plongez-y les myrtilles pendant 2 min. Egouttez les avant de les répartir dans les ramequins.
Laissez refroidir 2h au réfrigérateur. Vérifiez que les myrtilles n'ont pas perdu leur jus : si c'est le cas, penchez les assiettes pour les égoutter.

Une demi heure avant de ressortir les myrtilles, préparez la crème au citron. Dans un grand bol, battez ensemble les œufs, le jus de citron, le sucre et les zestes. Posez ce bol dans un bain marie (une casserole d'eau bouillante). Continuez de remuer jusqu'à ce que le mélange épaississe et prenne la consistance d'une crème. Attention, elle ne doit pas bouillir. Dès que la crème est assez épaisse, versez la dans un bol froid, pour stopper la cuisson, et ajoutez le beurre coupé en petits morceaux. Fouettez avec le batteur électrique pendant 10 minutes pour obtenir une consistance homogène et légère.

Recouvrez vos myrtilles de la crème de citron refroidie, et laissez au frais pour au moins 3h.

Avant de servir, saupoudrez chaque ramequin d'une cuillère de cassonade et passez 3 minutes sous le grill bien chaud, ou utilisez un chalumeau de cuisine pour caraméliser le dessus.
La suite, please

A summer breeze

By Mélanie, on Thursday, July 31, 2008

When I have friends over for dinner, I usually spend the whole week before searching for the perfect recipes. Although I don’t have any precise meal in mind, I have a vague idea of what I want (or don’t want) to cook. It’s like a math problem, combining all the constraints (no spinach, or no cheese, possible to make ahead, using seasonal ingredients, etc…) and exploring all the solutions. (Did I tell you I like math problems?).

But yesterday, I knew exactly what I wanted for dessert. Something ethereal and soft. Something with a sweet base, but balanced with the tartness of fruits. Something refreshing, cold or maybe even frozen. Something that would scream summer, and that would perfectly end a dinner with friends under the sun on my Parisian balcony. And then I decided, with a self confidence unknown before, that I would not even bother trying to find a recipe answering all these requirements. I would just make my own one!

Oh, what was I thinking??? I’ve never really been of the creative type, it’s kind of difficult for me to make any choice (I know, I’ve got to work on that one too!), and so began a very long process… Should I make a sponge cake, or an angel cake? If I roll the cake, a curd would probably be easier for the slicing part. But then it would feel a little more dense than a mousse. Or should I use yogurt to make a cream?
Well, I think you get the point…

I had passion fruit pulp from one of my previous trip to my Aladdin’s cave, and I decided to transform it into a mousse. I added some mango bits to sweeten and add a different texture. For the base (a thin angel food cake) and the crumb topping, I used shredded coconut. And you know what?? It was what I was looking for...


Summer Passion

For the angel cake
3/4 cup confectioner sugar
1 1/3 cups shredded coconut
1/4 cup flour
4 egg whites
1/4 cup brown sugar

For the crumb topping
1/4 cup butter at room temperature
1/3 cup + 1Tbsp flour
1/4 cup sugar
3/4 cup shredded coconut

For the passion mousse
1 cup passion fruit pulp (or concentrated juice)
3 tsp lime juice
1 envelop unflavoured gelatin
4 tsp sugar
1 1/3 cups whipping cream
1 ripe mango, cubed


Prepare the base and the crumble first, as they need to be cold when you’ll assemble the cake.

Preheat oven to 350°F.

In a large bowl, sift together flour and confectioner sugar. Add the shredded coconut.
Beat whites in mixer at medium speed until they form soft peaks. Add brown sugar gradually, beating, and continue beating at high speed just until whites are thickened and form soft, droopy peaks.
Sprinkle one third of sifted dry ingredients over whites and fold in with a rubber spatula gently but thoroughly. Fold in remaining dry ingredients, one third at a time.

If you don’t have a ring mold or a springform, you could use waxed paper / parchment cooking paper (?) to remove the finished cake from the pan easily.
Gently pour batter evenly into greased cake pan and bake until top is light golden, and a tester comes out clean, 25 to 30 minutes. I needed to serve this for only a few people, but for 2 occasions, so I used 2 loaf pans, and baked them for 20 minutes.
Transfer cake to rack; cool completely.

Prepare the crumb topping : cream the butter with the sugar. Add coconut and flour, and, using your fingertips, press them together to obtain moist clumps. Sprinkle this mixture over your greased baking sheet, and bake for 10 minutes at 330°F.
Break the crumbs that are too big, and let cool.
(Can be made 2 days ahead. Cover and store at room temperature.)

In a large bowl, combine passion fruit pulp and lime juice.
Sprinkle gelatin over water in a 1- to 1 1/2-quart heavy saucepan and let stand until softened, about 5 minutes. Heat gelatin mixture over low heat, stirring, just until gelatin is melted, about 2 minutes. Add to the fruit juices.

With your mixer at high speed, beat the cream with the sugar until soft peaks form (not too much). Working in 4 times, fold the whipped cream in the passion fruit mixture. Pour immediately half of the mousse over the angel food coconut cake, sprinkle with the mango cubes and spread the rest of the mousse over this. Put into the fridge and chill overnight.

It is best to sprinkle the cake with the coconut topping at the last moment. Un-mold the cake and serve.


Mousse Passion et son Duo de Coco

Pour la base coco
100 g de noix de coco râpée
75 g de sucre glace
25 g de farine
4 blancs d’œufs
50 g de sucre brun

Pour le crumble
50 g de beurre
50 g de farine
50 g de sucre
50 g de noix de coco râpée

Pour la mousse aux fruits de la passion
25 cl de pulpe de fruit de la passion
3 c. à café de jus de citron vert
3 feuilles de gélatine
33 cl de crème liquide
4 c. à café de sucre
1 mangue mure, coupée en cubes de 5-10 mm de coté

Commencez par préparer la base et le crumble, car ils doivent être refroidis pour l’assemblage du gâteau.

Dans un bol, mélangez la farine et le sucre glace tamisés, ainsi que la noix de coco.
A l’aide d’un batteur électrique, fouettez les blancs pour les rendre mousseux. Incorporez alors le sucre brun au fur et à mesure, tout en continuant de battre, puis en augmentant la vitesse. Vous devez obtenir un mélange ferme et brillant.
Ajoutez alors un tiers du mélange coco – sucre – farine, et incorporez le doucement à l’aide d’une cuillère en bois ou d’une maryse. Procédez de même pour les deux tiers restants.

Préchauffez le four à 180°.
Beurrez et farinez un moule à manqué ou un moule à fond amovible de 22cm de diamètre. Si vous n’avez pas de cercle à pâtisserie de la même taille ni de moule à fond amovible, vous pouvez chemiser le moule de papier sulfurisé, afin de faciliter le démoulage du gâteau une fois assemblé.

Versez le mélange dans le moule ainsi préparé, et enfournez pour 25 à 30 minutes, jusqu’à obtenir une belle couleur dorée. J’ai utilisé 2 moules à cake, j’ai donc réduit le temps de cuisson à 20mn.
Refroidir complètement. Si vous n’utilisez pas de cercle à pâtisserie, laissez le gateau dans son moule.

Préparez le crumble en mélangeant avec vos doigts le beurre pommade, le sucre, la noix de coco et la farine. Émiettez le crumble sur la plaque recouverte de papier siliconé et faites cuire environ 10 minutes à 165°.
Cassez les morceaux un peu trop gros et laissez refroidir à température ambiante. Ce crumble peut se préparer à l’avance. Une fois refroidi, conservez le dans une boîte hermétique.

Faites tremper la gélatine dans un bol d’eau froide.
Versez dans un grand bol la pulpe de fruit de la passion et le jus de citron vert.
Faites bouillir 2 cuillères à soupe d’eau dans une casserole. Retirez du feu et ajoutez-y la gélatine égouttée. Versez la gélatine une fois dissolue sur les jus de fruit, et remuez.
Montez au batteur électrique la crème fleurette liquide avec le sucre. La crème ne doit pas être trop ferme. Incorporez là alors doucement aux jus de fruit, en procédant en plusieurs fois.

Versez immédiatement la moitié de la préparation sur votre base de coco. Repartissez les morceaux de mangue dessus, et recouvrez du reste de la préparation. Laissez prendre au frigo pendant au moins 12 heures.

Pour garder le croustillant du crumble, assemblez le gâteau au dernier moment. Parsemez avec les miettes de coco, en appuyant légèrement, et démoulez le gâteau avant de le servir.
La suite, please