Zucchini and Basil Risotto

By Mélanie, on Monday, August 25, 2008

I’ve always been more a baker than a cook. Baking is about precision. When you’re cooking, you can just rely on your senses, and “feel” what and how much you want to put in your meal. It’s very dependant on your mood.

I was not able to do that. I needed to measure, to go through all steps. Impro? Not for me… I was following the recipe to the letter. And I was the kind of teenager who tells her mother off because she’s not doing exactly what’s written. My poor mum. It did not once occurred to me that she was doing her way for years and that it worked just as fine… Well, I guess you have to suffer when you have a teenage daughter!


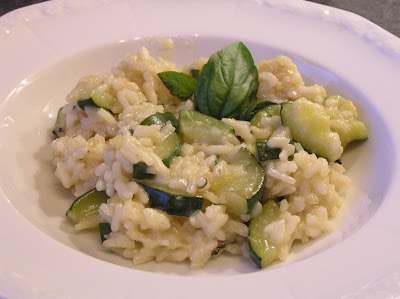
But now I also have the opportunity to cook. By spending more time in the kitchen, I gained some confidence. And even though I’m still more baking than cooking, I do enjoy both visions. I admit that I rarely cook for myself. For me, cooking is about generosity, wanting to please the other. So if there’s nobody to share it with, I just don’t see the point. But last night, I just wanted to please me. And what I needed for that was some rice, and some zucchini. I prepared it as a risotto, and I found the result actually good. So I hope you’ll enjoy it too.


Zucchini and basil risotto
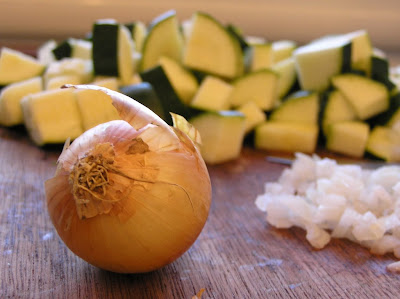
For 6 appetizers / 4 entrees
1 onion, thinly sliced lengthwise
1 Tbsp oil
2 medium zucchini, about 1 pound
2/3 cup Arborio rice
¼ cup dry white wine
2 ½ cup chicken broth
1/8 cup chopped basil
¼ cup grated parmesan cheese

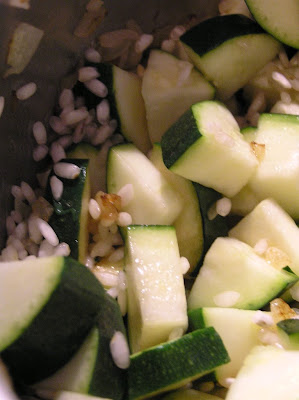
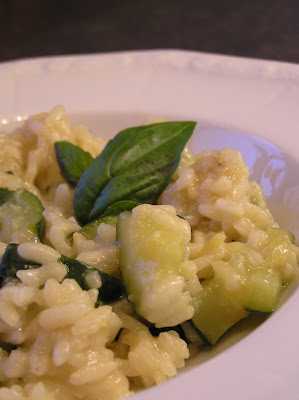
Heat oil in heavy large saucepan over medium heat. Add onion and cook until beginning to soften, about 3 minutes. Add rice and zucchini; stir 1 minute. Add wine and stir until almost all liquid is absorbed, about 1 minute. Add 1/2 cup hot broth. Simmer until broth is almost absorbed, stirring often, about 4 minutes. Add more broth, 1/2 cup at a time, allowing each addition to be absorbed before adding next and stirring often, until rice is tender and mixture is creamy, about 20 minutes longer. Stir in cheese. Transfer to large bowl, sprinkle with basil, and serve.

Risotto aux courgettes et basilic
Pour 6 entrées / 4 plats principaux

1 cuillère à soupe d’huile
1 oignon émincé
2 courgettes de taille moyenne, environ 450g
100g de riz rond ou Arborio
5 cl de vin blanc sec
½ litre de bouillon de poule (2 cubes)
25g de parmesan râpé
Basilic
Chauffez l'huile dans une grande casserole à température moyenne. Ajoutez l'oignon et faites le rissoler environ 3 minutes. Ajoutez le riz et la courgette ; remuez 1 minute. Ajoutez le vin et remuez jusqu'à ce que presque tout le liquide soit absorbé, environ 1 minute. Ajoutez une louche de bouillon chaud. Faites cuire jusqu'à ce que le bouillon soit presque absorbé, en remuant souvent, environ 4 minutes. Ajoutez plus de bouillon, une louche à la fois, en permettant à chaque addition d'être absorbée avant d’en rajouter tout en remuant souvent, jusqu'à ce que le riz soit tendre et le mélange crémeux, environ 20 minutes. Ajoutez le fromage et le basilic, et servez.

La suite, please

Travel & Adventures!

By Mélanie, on Wednesday, August 20, 2008

I will be in holidays for the next 20 days. I am leaving in a few hours. My backpack is ready. I’m ready!

This is all new for me : first time in Asia. First time without knowing where I’ll be sleeping in 3 days. First time without even knowing how and when I’ll go to the places I want to see! So this is adventure for me!

Maybe I’ll bring you back some recipes. In the meantime, I’ve prepared a few short posts. And a teaser : I made a test last week-end, and this what I’m going to talk about in September.


La suite, please

Pierre Hermé's blueberry and lemon dessert

By Mélanie, on Tuesday, August 19, 2008

Did I already tell you that I can be a bit monomaniacal ? Well, those last months, I have been a lot. Concerning desserts, my whole world revolves uniquely around Pierre Hermé.
It all started 3 months ago. I was walking home when I had to stop in front of this bookstore. Hum, now I understand why I need 20 more minutes to walk home than I need to go to work : in the evening, the shops are opened…

Anyway, here’s where my other obsession comes in : I tend to buy a lot of cook books. Like, really, a lot. In fact, I’ve almost called this blog “1 meter of recipes”, because it’s actually the length of my bookshelf dedicated to them. Scary, isn’t it? And like the picky girl that I am (yeah, that too…am I not charming?!?;-), it’s not even that I need every book I see. I do make a selection, with recipes tested many times, that requires real cooking, and not adding some blueberries to a pancake mix. Not that it’s wrong, I just don’t see why this is called a “recipe”…

Of course I have not read, and even less tried, half of the recipes. So I decided that, as I have 232 recipes highlighted (which means 232 recipes making me feel very curious. or simply drooling…), I should not buy any other cookbook.
And then, there was the bookstore.
And on display, the book.
On sale.
How could I resist??

Leafing through the book, I was seduced. In the next 3 weeks, I had already baked two of the beautiful cakes. And I was convinced. My grand mother too, who said it was the best cake I’d ever baked. Although they require some time, each step is so clearly explained that it feels simple. And the result is so good it’s definitively worth it.


So hey, can you really blame me for buying two of his other books?

While one is dedicated to chocolate, the other one has a section on summer fruits. Blueberries, peaches, apricots… Can’t you feel the warm summer days just thinking about those? I eat them fresh everyday, but on Sunday lunch there’s a dessert. And I want to use them while it’s still time, before entering the wonderful figs and pear season (ok, so maybe I’m more a fruit than chocolate girl, but don’t tell anyone!).
This is really a summer dessert. It’s lighter (in sensation, maybe not in calories), there’s no oven required. It’s fresh, thanks to the blueberries and the lemon.
If you like lemon tart, you’ll like this dessert. If you like crème brulée, you’ll like it too. And if you like both, you’ll love it! Because the adding of blueberries just makes it even more special… and sophisticated, if you want to serve it for a special occasion.


Blueberries and lemon crème brulée
4 servings

For the blueberries:
17 oz. blueberries
2 ½ cups sugar
Juice of 1 lemon
1 tsp. cardamom

For the lemon cream:
1/3 cup lemon juice
2 eggs
Zest of 1.5 lemons
1/2 cup sugar
1 stick butter

4 tsp. brown sugar

Pour 4 cups of water into a boiling pan with the sugar and the lemon juice. When the water is boiling, cook the blueberries for 2 minutes. Drain and distribute into 4 ramekins.
Let cool 2 hours in the refrigerator. Verify that the blueberries did not lose their juice, otherwise, tilt the ramekins over the sink to drain them.

Prepare the lemon cream. In a big bowl, beat together the eggs, the lemon juice and zest, the sugar.
Place the bowl over a bain marie (a pan of boiling water). Continue to whisk until the mixture thickens and has the consistency of a cream (about 10 minutes). Be careful that it doesn’t boil.
As soon as the cream is ready, change it to a cold bowl, to stop the cooking. Add the butter cut in small pieces. Whisk with the mixer during 10 minutes to obtain a homogeneous consistency.

Cover the blueberries with the lemon cream and leave in the refrigerator for at least 3 hours.

Before serving, sprinkle each ramekin with a teaspoon of brown sugar. Place under hot broiler for 3 minutes until sugar caramelizes. Serve immediately.


Douceur de myrtilles au citron
Pour 4 ramequins

Pour les myrtilles :
500 g de myrtilles
550 g de sucre
1 citron (pour le jus)
1 c. à café de cardamome

Pour la crème de citron :
8 cl de jus de citron
2 œufs
le zeste d’1 citron et demi
110 g de sucre
100 g de beurre

4 cuillères à café de sucre brun


Versez 1 l d'eau dans une grande casserole avec le sucre et le jus de citron. Lorsque l'eau bout, plongez-y les myrtilles pendant 2 min. Egouttez les avant de les répartir dans les ramequins.
Laissez refroidir 2h au réfrigérateur. Vérifiez que les myrtilles n'ont pas perdu leur jus : si c'est le cas, penchez les assiettes pour les égoutter.

Une demi heure avant de ressortir les myrtilles, préparez la crème au citron. Dans un grand bol, battez ensemble les œufs, le jus de citron, le sucre et les zestes. Posez ce bol dans un bain marie (une casserole d'eau bouillante). Continuez de remuer jusqu'à ce que le mélange épaississe et prenne la consistance d'une crème. Attention, elle ne doit pas bouillir. Dès que la crème est assez épaisse, versez la dans un bol froid, pour stopper la cuisson, et ajoutez le beurre coupé en petits morceaux. Fouettez avec le batteur électrique pendant 10 minutes pour obtenir une consistance homogène et légère.

Recouvrez vos myrtilles de la crème de citron refroidie, et laissez au frais pour au moins 3h.

Avant de servir, saupoudrez chaque ramequin d'une cuillère de cassonade et passez 3 minutes sous le grill bien chaud, ou utilisez un chalumeau de cuisine pour caraméliser le dessus.
La suite, please

Baking, anywhere

By Mélanie, on Saturday, August 16, 2008


I left without even saying goodbye. I went far, far away, to a deserted island. Well, ok, maybe this is quite exaggerated. But this was one week without turning the TV or the computer on. One week in a nice old house, with six other young people (what, you have some doubts? we are young! It’s just a matter of reference anyway…), and close to the beach. And yes, I was able to wear my bathing suit for the first time in the last 18 months!!


Alas, some clouds just seem to ignore the concept of microclimate. This was not really a problem, and I traded the bathing suit for a more usual accessory, the apron!


Before leaving, I knew that I would maybe have the opportunity to bake something. A dessert is always enjoyed! (what I did not know, though, is that everybody would want to cook, so if you’re reading this, thank you guys for all the good meals we shared together).
I did not want to travel with my cookbooks (although it would have been a nice practice for the Olympics) and very strangely, it seems that I’m unable of remembering any recipe. Maybe it’s because I always want to try something new. This is a familiar syndrome for the food blogger we are. I know, what’s the point of finding a good recipe if you won’t make it again?? But that would mean not listening to the tiny voice suggesting that, maybe, the next recipe will be even better… And what would this blog become if I did not listen to her?!?


I restricted the recipes to ONE piece of paper, with everything vital (am I exaggerating again?) for baking. The pâte sucrée (sugar dough) and choux pastry from Alain Ducasse, the cream pastry and mascarpone mousse from Pierre Hermé, the almond cream from Eric Kayser, the fruit mousse from … . I was ready to go! Tell me what you want, and I’ll do it!
We had some peaches and vanilla ice cream? A sablé Breton is the answer!
Feel like lemon curd? What about a lemon and strawberries pie?


But the most successful was the almond and plum tart. Did I tell you I love almonds? I LOVE almonds. Shredded in salads. Whole with swiss chards. Ground in pie dough. As marzipan in... anything! (it tastes good in chocolate bonbons, for a cake’s decoration or inside the cake...). I think you’ve got the point...
I also like to use fruits usually a bit tart for desserts. I think it brings the best out of them. Sweet fruits, like nectarine or strawberries, are just so good on their own. Of course they are good in a pie too, but it does not titillate your palate the way that raspberries, rhubarb or baked apricots do... You know, that contrast between the fruit and the sweet pie crust / crumble / meringue (or anything you want).

So I know this is a basic pie, nothing new to discover. But sometimes you just need a quick and simple recipe. And I like it a lot (did I mention there’s almond in it??). Plus, it’s the kind of pie that brings guys to ask you if you’re single. Do I need to say more?


Plum and almond tart

For the sugar dough
1 ½ stick of butter, at room temperature
1 egg
½ cup sugar
1/8 cup almond power
2 cups flour

For the almond cream
1 ¼ cup granulated sugar
3 eggs
½ cup almond powder
½ cup whipping cream
1/8 cup + 2 tsp butter

About 2 pounds quetsche plums

Prepare the pie dough :
First cream the butter with the egg in your mixer, before adding the sugar, almond powder and flour to obtain a compact dough. Form a ball with the dough and flatten into a disk. Wrap in plastic wrap and refrigerate at least 30 minutes and up to 2 days.

For the almond cream :
In the large bowl of your food processor, beat at high speed the eggs with the sugar until creamy. Add the almond powder and the whipping cream, and pulse until incorporated. Melt the butter and pour it on the mixture while beating.

Preheat oven to 340°F.

Roll the disk of dough into an 12-inch circle, 1/4-inch thick, on a lightly floured surface. Line a 10-inch pie pan, leaving a 1-inch overhang.
Line shell with foil and fill with pie weights. Bake until edge is pale golden, about 10 minutes.

While crust bakes, divide the plums in two and remove the pit.

Once the crust is baked, pour almond filling over the tart shell and arrange plums over it. Put pan on a baking sheet and bake until crust and filling are golden and plums are tender, 30 to 40 minutes. Cool tart completely in pan on a rack before unmolding. Just before serving, dust with confectioners sugar.


Tarte amandine aux quetsches


Pour la pâte sucrée
250g de farine
150g de beurre à température ambiante
100g de sucre
30g de poudre d’amande
1 œuf

Pour la crème d’amandes
100g de poudre d’amandes
10cl de crème liquide
3 œufs
240g de sucre
40g de beurre

1kg de quetsches

Préparez la pâte à tarte :
Mettez d'abord le beurre avec l'œuf dans le bol de votre robot mixer. Malaxer quelques instants, avant d'ajouter le sucre, la poudre d'amande et la farine pour obtenir une pâte homogène. Formez une boule avec la pâte et aplatissez-la avec la paume de la main. Enveloppez la dans le plastique et laissez reposer au réfrigérateur pendant au moins 30 minutes et jusqu'à 2 jours.

Pour la crème amandine :
Dans le bol de votre robot, battez les œufs avec le sucre jusqu'à ce que le mélange devienne crémeux. Incorporez la poudre d'amande et la crème liquide, puis le beurre préalablement fondu.
Préchauffez le four à 170°.

Etalez le disque de pâte en un cercle légèrement plus grand que votre moule à tarte (la recette a été faite avec un moule de 27cm). Garnissez votre moule (beurré et fariné) avec la pâte et faites la précuire 10 minutes au four.

Pendant ce temps, divisez les prunes dans deux et enlevez les noyaux.

Une fois que la pâte est cuite, versez la crème d’amande et disposez les prunes, coté bombé en dessous. Faites cuire au four jusqu'à ce que la tarte soit dorée, 30 à 40 minutes. Laissez refroidir et saupoudrez de sucre glace avant de la servir.
La suite, please

Like Lucky Luke

By Mélanie, on Tuesday, August 5, 2008


Lucky Luke draws a gun faster than his shadow. Well, if my shadow is supposed to write about my culinary experiences while I’m cooking, then I’m definitively a lot faster than she is. The truth is, the week-end does not make things better : I have not only the (late) evening but the whole day to prepare some desserts. Yes, you’ll be able to see daylight on my pictures!!


And this week-end was all about cooking and baking. Saturday in the kitchen started at 10 am (no, no more sleep in for me…) and finished at 5:30 pm. With 4 recipes to tell you about.


So, what have I done? It’s Tuesday and still nothing? Am I already on strike? (I’m French, it wouldn’t be that surprising…). Well, the thing is, I’m stubborn. Hey, did someone say monomaniacal ?? When something bugs me, even a little detail, I’ve got to fix it, I can’t work on any other project. This is how I ended up totally dismantling a photocopier because of a paper jam. And this time, even though I don’t understand a thing about html / css , I had to find a way to put a link and not to show the whole posts on my page. I know it’s supposed to be simple. But, when it comes to computers, if I can’t do it with Excel, then… I can’t do it... (so if anyone knows how I can create an index to classify my recipes, PLEASE, don’t hesitate!!)


Anyway, now it’s done, let’s start with the tomato tarte tatin. It’s the first recipe of the week-end, but, most of all, it still balances the number of recipe for sweets. Who would ever have believed that?? (Oh no, it won’t stay that way long…)


I will not tell you that this tarte tatin was perfect. It could be improved. Maybe with some balsamic vinegar reduction. Its sweetness and syrupy texture would marry well with the fragrance of tomatoes and the caramelized (oh, so caramelized. so good….) crust. Or maybe by giving it a more pronounced flavor of garlic and thyme.
But it’s worth the try. Because even without those improvements, we all had a second helping…


Oh, and btw, the photocopier worked fine after I put it back together!!


Tomato Tarte Tatin
From L’ami des jardins et de la maison, Juillet 2008
8 tomatoes
1 package frozen puff pastry, thawed
2 oz. Parmesan
2 Tbsp olive oil
2 tsp sugar
Salt and pepper

Peel the tomatoes : if you don’t have a peeler, let them 2 minutes in boiling water before peeling.
Remove the stem, but leave the tomatoes whole. Add salt and pepper to taste.
Heat one tablespoon oil in a skillet. Cook the tomatoes about 10 minutes, uncovered, over medium heat. Turn them once.
Preheat oven to 350°F.
Grease you pie shell and sprinkle 1 teaspoon sugar. Arrange the tomatoes, sprinkle with the rest of sugar and put in the oven for 20 minutes.
Sprinkle with parmesan, and let cool for 20 more minutes.
Heat oven to 390°.
Arrange the puff pastry sheet over the tomatoes, and put back in the oven for 20 minutes.
Cover the pie shell with your serving plate, and invert to loosen pie. Serve immediately.


Tatin de tomates
De l’Ami des jardins et de la maison, Juillet 2008
8 tomates moyennes,
1 cercle de pâte feuilletée,
50g de parmesan rapé
2 cuillères à soupe d’huile d’olive
2 cuillères à café de sucre
Sel et poivre

Pelez les tomates : si vous n’avez pas de peleur, plongez les dans une casserole d’eau bouillante pendant 2 minutes, la peau s’enlèvera ensuite sans difficulté.
Eliminez les pédoncules, salez et poivrez les tomates.
Faites les revenir dans une poêle chaude avec une cuillère d’huile d’olive pendant une dizaine de minutes. Commencez par faire revenir le dessous de la tomate, puis retournez les pour qu’elles rejettent leur eau.
Huilez le moule à tarte, soupoudrez d’une cuillère de sucre et disposez les tomates. Ajoutez le reste du sucre et faites cuire à 180° pour 20 minutes.
Sortez le plat du four et soupoudrez avec le parmesan. Laissez refroidir encore 20 minutes.
Recouvrez les tomates avec le cercle de pâte, en rentrant les rebords à l’intérieur du moule. Faites cuire 20 minutes à 200°.
Démoulez la tarte tatin et servez aussitôt.
La suite, please