The end of summer

By Mélanie, on Sunday, September 28, 2008

You might think that I forgot about my blog during my holidays. I have not been very active since I came back. Well, this is so not true. As a matter of fact, I’ve been writing my future post every day, walking to work. It’s just that it stayed “written” in my head, and I never had time to type it… And, as the weeks passed, along with the weather, the next recipe kept changing.

At first it was the beginning of September. You know how it is, even if there’s no back to school since a long time (don’t make me count!!), you still feel like a new year is beginning, and you want to make a fresh start. So my good resolution was to clean my “to post file”, full of summer recipes, before starting with the new ones. And then I had too much work, too much cooking (ohh, it was so disastrous… don’t ever try to bake a celebration cake after 13 hours spent in the plane and not having slept in the last 36 hour. well, unless you’ve got 8 eggs to throw away, along with the 2 curds you just messed up!), and finally I started to make new things that I wanted to tell you about.


And to be honest, do I really want to give you the recipe for the mascarpone mousse with berries? It was too contrasted, I would not make it again… That cream cheese and cherry cake? Too salty (St Moret cannot replace Philadelphia, believe me !). The 2 strawberries pies? Sooo good (of course! They’re strawberries pie!). But we’re out of season now. That’s sad enough, I don’t want to twist the knife in the wound! I’ll just try to forget it and focus on fall’s fruits until next year. So I did clear my file, just not the way I thought I would!
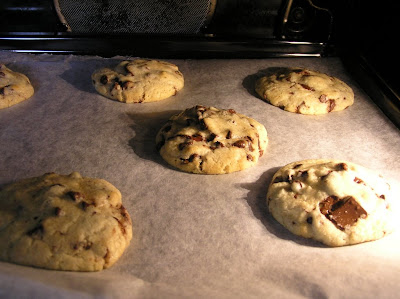
So, what happened in my kitchen in the last 3 weeks? I mean, except for the chocolate birthday cake (turned out way too chocolaty, as I just could not manage not to ruin the passion fruit curd), the 4 different kinds of cupcakes I made for a housewarming party (each worse than the other), or the bland and sticky angel food cupcakes? (I am picky, you see!)
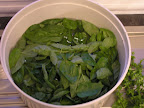
I had a good surprise. You see, when I came back from my holidays, I was worried for the plantations on my balcony. I shouldn’t have! The basil had really enjoyed the fertilizer, and was now more than 3 feet high. I couldn’t let the cold (and the caterpillar) get it. I had to do something. What could I do with basil? With a lot of basil?

So I made pesto. Pesto is a sauce coming from Italy (more specifically, from Liguria), with basil, pine nuts, garlic and olive oil. Traditionally, you would use a mortar to prepare it (it integrates the ingredients better than a machine and produces a creamier sauce), but even though it really makes a difference, I used a food processor (I told you. I had a lot of basil)
It’s the perfect way to keep it longer, and it’s incredible how many uses you’ll find for it. Of course it can be enjoyed with fresh pasta. I personally find it too strong and too nutty to use it solely with pasta. But it accompanied nicely halibut with fresh vegetables. It was used as a dressing for orzo salad (perfect for a picnic next summer). And it totally made the difference in a minestrone. And I still have one more jar to use!


Pesto
Adapted from Ma Little Italy, Laura Zavan

For 2 jars of pesto
5 cups clean and dry fresh basil
½ cup pine nuts
2 garlic cloves
1 Tbsp salt
¾ cup olive oil
2/3 cup shredded Parmesan

Heat a large heavy skillet over medium heat and cook pine nuts, stirring, until golden, about 5 minutes. With food processor running, drop in nuts and coarsely crush them.
Finely chop garlic and basil. Add them to the nuts, salt and mix quickly. Do not use the robot too long, the sauce would loose its flavors. With motor running, add oil and cheese, blending until incorporated.

Orzo with pesto and cherry tomatoes

For 4 people
¼ pound orzo
6 ounces cherry tomatoes (about 1/2 pint)
1/4 pound feta
4 Tbsp pesto
1 Tbsp olive oil
1 Tbsp red-wine vinegar
Salt & Pepper

Fill a 4-quart pasta pot three fourths full with salted water and bring to a boil for orzo.
Quarter tomatoes and coarsely crumble feta. In a large bowl whisk together pesto, vinegar, remaining tablespoon oil, salt and pepper to taste. Add tomatoes and feta and gently toss to combine.
Cook orzo in boiling water, stirring occasionally, until al dente. In a large sieve drain orzo and rinse slightly until just warm. Drain orzo well and add to tomato mixture, tossing until just combined.


Pesto
Adapté de Ma Little Italy, Laura Zavan

Pour 2 pots de pesto
80g de basilic lavé et séché
40g de pignons de pins
2 gousses d’ail
1 cuillère de sel
20cl d’huile d’olive
50g de parmesan

Faites griller 5 minutes les pignons dans une poêle antiadhésive. Passez-les ensuite au robot mixer afin de les concasser grossièrement.
Emincez l’ail et le basilic finement. Ajoutez les aux pignons avec le sel et mixez rapidement. N’utilisez pas le robot trop longuement car cela fait perdre sa saveur à la sauce. Ajoutez ensuite le parmesan et l’huile versée en filet fin.

Riso au pesto et aux tomates cerises

Pour 4 personnes
200g de riso (pâtes en forme de riz)
200g de tomates cerises
100g de feta
4 cuillères à soupe de pesto
1 cuillère d’huile d’olive
1 cuillère de vinaigre de vin
Sel et poivre

Dans une casserole d’eau bouillante, faites cuire les pâtes selon les spécifications. Pendant ce temps, coupez les tomates cerise en 4 et la feta en petits dés.
Egouttez les pates, passez les sous l’eau froide pour stopper la cuisson et versez les dans un saladier. Ajoutez les tomates, le fromage, le pesto, l’huile d’olive et le vinaigre. Salez et poivrez à votre goût.
La suite, please

As promised... the cookies!

By Mélanie, on Monday, September 15, 2008

I know. I’m bad. I show you this picture of cookies, and then leave you without anything for almost a month.
So here we go!
But first I need to tell you that there’s something between me and cookies. At least that’s what my entourage thinks... As if I was the reference or something like that. I even have a friend whose colleagues ask if they’re going to have some of my cookies soon. Weird, isn’t it?
Because to be honest, I don’t know why. I don't deserve it. I don't do anything special, they're not extraordinary. I haven’t found the recipe yet. And because I find it difficult to resist to cookie dough (yes, I'll admit it. I first started cooking because I prefered the batter to the baked cake...), my hips thank me for not making them so often. Ok, that’s still more frequently than most of the people I know, but if you look the ratio “number of time I bake cookies / number of time I bake” (nobody’s against statistics right?), I’m clearly not on top.

So I thought of many explanations. Like the fact that I lived in the US for a few months. Or the fact that I’m the one cooking all those American classics that sometimes sound strange to French people (bread made of zucchinis? And muffins with carrots? Without speaking of cakes with cream cheese?...). Or the fact that half of my recipes are American ones (a 2 years subscription to Bon Appetit helped that), which means that I have dozens of different cookies recipes. So basically that I love the US, including the food, and what are cookies if not typically American?

But some people don’t know that. And even less do they know that I used to make and sell huge cookies in a bakery during my first stay in the US. We had peanut butter, M&M’s, molasses, chocolate chips, oatmeal raisins... It had become such a routine, cutting the dough, weighting, putting 5 M&M’s on every cookies, baking, etc... But this was nothing compared to the thousands of donuts I prepared, and that’s what I talk about when I think about my work in this restaurant.

So I guess the real reason for my cookies to be appreciated is that, when I make them, I prepare a lot of different kinds.
This way:
- People are happy because it gives them an excuse to eat a lot of cookies : they’ve got to try all the flavours!
- I can satisfy every one : even if you don’t like peanut butter, or raisins, or cinnamon, or white chocolate, you’ll still find something that doesn’t contain those ingredients.
- They seem to taste better (and this is tricky!) : even if they’re not that good, there’s always one that you prefer, and what you remember is “oh yeah, these were really standing out”. Actually, this is a very new theory of my own, but I’m sure it works!

I know what you’re thinking. You’re not crazy like me, you don’t want to spend hours in the kitchen, preparing four kinds of different cookies (four times more work, four time more dishes to wash!). But I don’t either! This is even the best part about cookies: it allows me to be lazy. I just double a basic dough recipe (like this one), divide the dough in 3 or 4 bowls, and add whatever I have on hand, depending on my inspiration: white chocolate & cranberries, cocoa & hazelnuts, oatmeal & chocolate chips, coffee and marshmallows (interesting results btw) and so on...
I know it’s not perfect, some combination should require more or less sugar or flour, but it works pretty fine.

So now you understand how captivated I was when reading this article from the NY Times. The key to the perfect cookies? Yes please! I could become a superstar with that! Or not... But I guess just having people enjoying a little more my cookies will be enough for me.

One month passed before I could try them. I wanted enough time & people to make a complete and scientific test. Because this is not (only) about the recipe. It’s about the secrets to make them better. Waiting 36 hours before baking. Using chocolate disks instead of chips or chunks. Jumbo sizing them. This is not what I’m used to. And I needed to compare on each of these criteria and see by myself if this was really making a difference.

Here are the results :

- Waiting 36 hours : just as in the article, I divided the dough in three batches, one baked immediately, one after 24 hours in the fridge, and the last one after 45 hours. And it is true that the texture was quite better. The 45 hours cookies were more crumbly on the edge, browner and crispier. This made the difference with the soft and chewy centre more noticeable. From now on, I will definitively prepare the dough at least one day in advance.

- Using chocolate disks : I did not have enough chocolate disks and completed with chunks and chips. We did not like the use of the dark chocolate disks : they were too big and too strong, and concealed the taste of the cookies. In our opinion, the chunks were the perfect size, but if you’re a chocolate addict, you might disagree with us.

- Jumbo size : Wow, when I first read six inches (and converted it in centimetres! a.k.a. 15 cm), I was incredulous. And what, bake them 4 by 4, because they don’t fit in the baking pan? Is this just about wanting everything big, just like the serving size in the restaurants? Well, I was wrong. Size is important. The smaller ones were hard once at room temperature, while the bigger ones (especially the 24h batch) became a little chewy in the inside. It depends on the texture you want to achieve... In my family, they’re gonna be jumbo size now!

<

This is the recipe inspired from the NY Times, but the previous advices could be applied to any other...
Chocolate Chip Cookies
2 2/3 cups flour
1 1/4 teaspoons baking soda
1 1/2 teaspoons baking powder
1 1/2 teaspoons coarse salt
2 1/2 sticks (1 ¼ cups) unsalted butter
1 1/8 cups brown sugar
1 1/8 cups sugar
2 large eggs
1 vanilla pod
1 pounds bittersweet chocolate chunks
Sea salt.

Sift flour, baking soda, baking powder and salt into a bowl.
Using your mixer, cream butter and sugars together. Add eggs, one at a time, mixing well after each addition. Stir in the vanilla. Reduce speed to low, add dry ingredients and mix until just combined, 5 to 10 seconds. Drop chocolate pieces in and incorporate them without breaking them. Press plastic wrap against dough and refrigerate for 24 to 36 hours. Dough may be used in batches, and can be refrigerated for up to 72 hours.
Preheat oven to 350 degrees. Line the baking sheets with parchment paper. Scoop 3 1/2-ounce mounds of dough (the size of generous golf balls) onto baking sheet. Sprinkle lightly with sea salt and bake until golden brown but still soft, 15 to 20 minutes. Transfer sheets to a wire rack for 10 minutes, then slip cookies onto another rack to cool a bit more. Repeat with remaining dough. Eat warm.


Cookies aux pépites de chocolat

480g de farine
3 cuillères à café de levure
1 cuillère à café de sel
250g de beurre à température ambiante
280g de sucre brun
225g de sucre
2 oeufs
1 gousse de vanille
400g de chocolat, grossièrement brisé
Fleur de sel

Mélangez la farine, la levure et le sel dans un saladier à part.
En utilisant la spatule de votre robot, travaillez le beurre ramolli avec les sucres jusqu'à ce que le mélange blanchisse. Ajoutez les graines de vanille et les oeufs, un par un, en mélangeant bien après chaque addition. Réduisez la vitesse du robot et ajoutez le mélange à base de farine. Ne travaillez pas trop la pâte (environ 15 secondes). Incorporez ensuite les morceaux de chocolat en mélangeant avec une cuillère, pour ne pas les casser.
Couvrez la pâte d’un film plastique et réfrigérez 24 à 36 heures. La pâte peut être utilisée en plusieurs fois et peut être réfrigérée jusqu'à 72 heures.
Préchauffez le four à 170°.
Tapissez les plaques à pâtisserie de papier sulfurisé. A l’aide d’une cuillère à glace (ou d’une grosse cuillère), faites des tas de pâte de la taille d’une balle de golf, et disposez les sur la plaque. Prenez soin de les espacer suffisamment pour ne pas qu’ils se collent entre eux lors de la cuisson. Saupoudrez légèrement de fleur de sel et enfournez pour environ 15 à 20 minutes. Plus les cookies seront colorés, plus ils seront secs. Si vous les aimez moelleux avec le cœur pâteux, sortez les du four lorsque le milieu du cookie est encore clair.
Laissez les refroidir quelques minutes avant de les transférer sur une grille.
Dégustez les encore chauds.
La suite, please

Chocolate Tart

By Mélanie, on Monday, September 1, 2008

You know I told you I'm always trying new recipes, and therefore never making the same meal twice.
Well, every rule has its exception.
Actually, there's two exceptions. Both are from the book : Le meilleur et le plus simple de Joel Robuchon (the best and easiest from Joel Robuchon). The chocolate tart, and the opened apple pie.
I don't know for how long we have been making this recipe, my mother or me. At least 12 years. And as it is good and so easy to make (hence the title of the book!), we've been preparing it a lot.And I know it by heart...


Chocolate tart

1 pâte sucrée shell (from my almond and plum pie) / 1 fond de tarte en pâte sablée ou sucrée
7 oz. non bitter chocolate / 200g de chocolat
3/4 cup whipping cream / 20cl de crème fleurette
1/3 cup milk / 8 cl de lait
1 egg

Preheat oven to 350°F (180°C)

Roll the disk of dough into an 12-inch circle, 1/4-inch thick, on a lightly floured surface. Line a 10-inch pie pan, leaving a 1-inch overhang.
Line shell with foil and fill with pie weights. Bake until edge is pale golden, about 10 minutes.

While crust bakes, bring the cream and the milk to boil in a small saucepan. Remove from heat, and put the chocolate in the cream. Whisk until the chocolate is melted. Then add the egg and mix until homogenous.

Once the crust is baked, pour chocolate filling over the tart shell. Put pan on a baking sheet and bake 15 to 20 minutes. Cool tart completely in pan on a rack before unmolding and serving. La suite, please