A summer breeze

By Mélanie, on Thursday, July 31, 2008

When I have friends over for dinner, I usually spend the whole week before searching for the perfect recipes. Although I don’t have any precise meal in mind, I have a vague idea of what I want (or don’t want) to cook. It’s like a math problem, combining all the constraints (no spinach, or no cheese, possible to make ahead, using seasonal ingredients, etc…) and exploring all the solutions. (Did I tell you I like math problems?).

But yesterday, I knew exactly what I wanted for dessert. Something ethereal and soft. Something with a sweet base, but balanced with the tartness of fruits. Something refreshing, cold or maybe even frozen. Something that would scream summer, and that would perfectly end a dinner with friends under the sun on my Parisian balcony. And then I decided, with a self confidence unknown before, that I would not even bother trying to find a recipe answering all these requirements. I would just make my own one!

Oh, what was I thinking??? I’ve never really been of the creative type, it’s kind of difficult for me to make any choice (I know, I’ve got to work on that one too!), and so began a very long process… Should I make a sponge cake, or an angel cake? If I roll the cake, a curd would probably be easier for the slicing part. But then it would feel a little more dense than a mousse. Or should I use yogurt to make a cream?
Well, I think you get the point…

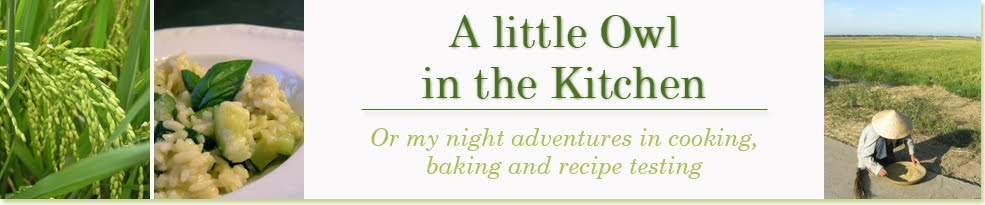
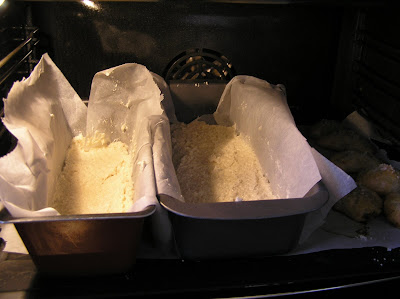
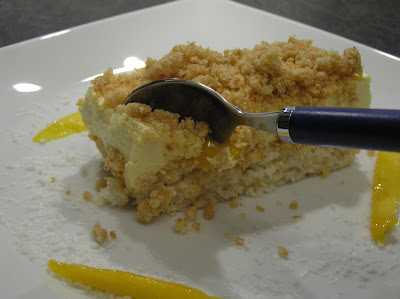
I had passion fruit pulp from one of my previous trip to my Aladdin’s cave, and I decided to transform it into a mousse. I added some mango bits to sweeten and add a different texture. For the base (a thin angel food cake) and the crumb topping, I used shredded coconut. And you know what?? It was what I was looking for...


Summer Passion

For the angel cake
3/4 cup confectioner sugar
1 1/3 cups shredded coconut
1/4 cup flour
4 egg whites
1/4 cup brown sugar

For the crumb topping
1/4 cup butter at room temperature
1/3 cup + 1Tbsp flour
1/4 cup sugar
3/4 cup shredded coconut

For the passion mousse
1 cup passion fruit pulp (or concentrated juice)
3 tsp lime juice
1 envelop unflavoured gelatin
4 tsp sugar
1 1/3 cups whipping cream
1 ripe mango, cubed


Prepare the base and the crumble first, as they need to be cold when you’ll assemble the cake.

Preheat oven to 350°F.

In a large bowl, sift together flour and confectioner sugar. Add the shredded coconut.
Beat whites in mixer at medium speed until they form soft peaks. Add brown sugar gradually, beating, and continue beating at high speed just until whites are thickened and form soft, droopy peaks.
Sprinkle one third of sifted dry ingredients over whites and fold in with a rubber spatula gently but thoroughly. Fold in remaining dry ingredients, one third at a time.

If you don’t have a ring mold or a springform, you could use waxed paper / parchment cooking paper (?) to remove the finished cake from the pan easily.
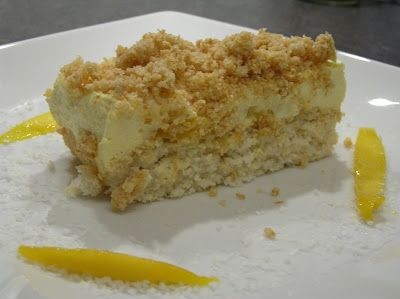
Gently pour batter evenly into greased cake pan and bake until top is light golden, and a tester comes out clean, 25 to 30 minutes. I needed to serve this for only a few people, but for 2 occasions, so I used 2 loaf pans, and baked them for 20 minutes.
Transfer cake to rack; cool completely.

Prepare the crumb topping : cream the butter with the sugar. Add coconut and flour, and, using your fingertips, press them together to obtain moist clumps. Sprinkle this mixture over your greased baking sheet, and bake for 10 minutes at 330°F.
Break the crumbs that are too big, and let cool.
(Can be made 2 days ahead. Cover and store at room temperature.)

In a large bowl, combine passion fruit pulp and lime juice.
Sprinkle gelatin over water in a 1- to 1 1/2-quart heavy saucepan and let stand until softened, about 5 minutes. Heat gelatin mixture over low heat, stirring, just until gelatin is melted, about 2 minutes. Add to the fruit juices.

With your mixer at high speed, beat the cream with the sugar until soft peaks form (not too much). Working in 4 times, fold the whipped cream in the passion fruit mixture. Pour immediately half of the mousse over the angel food coconut cake, sprinkle with the mango cubes and spread the rest of the mousse over this. Put into the fridge and chill overnight.

It is best to sprinkle the cake with the coconut topping at the last moment. Un-mold the cake and serve.


Mousse Passion et son Duo de Coco

Pour la base coco
100 g de noix de coco râpée
75 g de sucre glace
25 g de farine
4 blancs d’œufs
50 g de sucre brun

Pour le crumble
50 g de beurre
50 g de farine
50 g de sucre
50 g de noix de coco râpée

Pour la mousse aux fruits de la passion
25 cl de pulpe de fruit de la passion
3 c. à café de jus de citron vert
3 feuilles de gélatine
33 cl de crème liquide
4 c. à café de sucre
1 mangue mure, coupée en cubes de 5-10 mm de coté

Commencez par préparer la base et le crumble, car ils doivent être refroidis pour l’assemblage du gâteau.

Dans un bol, mélangez la farine et le sucre glace tamisés, ainsi que la noix de coco.
A l’aide d’un batteur électrique, fouettez les blancs pour les rendre mousseux. Incorporez alors le sucre brun au fur et à mesure, tout en continuant de battre, puis en augmentant la vitesse. Vous devez obtenir un mélange ferme et brillant.
Ajoutez alors un tiers du mélange coco – sucre – farine, et incorporez le doucement à l’aide d’une cuillère en bois ou d’une maryse. Procédez de même pour les deux tiers restants.

Préchauffez le four à 180°.
Beurrez et farinez un moule à manqué ou un moule à fond amovible de 22cm de diamètre. Si vous n’avez pas de cercle à pâtisserie de la même taille ni de moule à fond amovible, vous pouvez chemiser le moule de papier sulfurisé, afin de faciliter le démoulage du gâteau une fois assemblé.

Versez le mélange dans le moule ainsi préparé, et enfournez pour 25 à 30 minutes, jusqu’à obtenir une belle couleur dorée. J’ai utilisé 2 moules à cake, j’ai donc réduit le temps de cuisson à 20mn.
Refroidir complètement. Si vous n’utilisez pas de cercle à pâtisserie, laissez le gateau dans son moule.

Préparez le crumble en mélangeant avec vos doigts le beurre pommade, le sucre, la noix de coco et la farine. Émiettez le crumble sur la plaque recouverte de papier siliconé et faites cuire environ 10 minutes à 165°.
Cassez les morceaux un peu trop gros et laissez refroidir à température ambiante. Ce crumble peut se préparer à l’avance. Une fois refroidi, conservez le dans une boîte hermétique.

Faites tremper la gélatine dans un bol d’eau froide.
Versez dans un grand bol la pulpe de fruit de la passion et le jus de citron vert.
Faites bouillir 2 cuillères à soupe d’eau dans une casserole. Retirez du feu et ajoutez-y la gélatine égouttée. Versez la gélatine une fois dissolue sur les jus de fruit, et remuez.
Montez au batteur électrique la crème fleurette liquide avec le sucre. La crème ne doit pas être trop ferme. Incorporez là alors doucement aux jus de fruit, en procédant en plusieurs fois.

Versez immédiatement la moitié de la préparation sur votre base de coco. Repartissez les morceaux de mangue dessus, et recouvrez du reste de la préparation. Laissez prendre au frigo pendant au moins 12 heures.

Pour garder le croustillant du crumble, assemblez le gâteau au dernier moment. Parsemez avec les miettes de coco, en appuyant légèrement, et démoulez le gâteau avant de le servir.
La suite, please

Light please

By Mélanie, on Wednesday, July 30, 2008


Wow. I did not see that coming! I was so concerned with my first post, taking many pictures, that I did not imagine the following would cause any trouble. I mean, I have many recipes to share! So the only problem I could have would be to choose one!

Well, it doesn’t work that way… For the past few weeks, I have been trying to take pictures of the cakes I made. Except that, with this rule of “I can never be happy with the result of what I did” (yeah, I know, I’ve really got to do something about this one!), I faced two problems. Either the cake looked beautiful, but tasted just… ok (it’s got sugar in it, by definition, it cannot taste bad!), either it was good, but the pictures were horrible. “Why care?” could you say, “you shouldn’t judge a book by its cover”. But they were really ugly. Like, you would never have tried the recipe!

I needed some inspiration. And while thinking of this, I started to prepare my dinner. Summer has finally arrived in Paris, with more than 10 days of sunshine and hot weather, and salads are just the nicest way to celebrate this. Just smelling the odour of fresh tomatoes or basil reminds me of holidays and keeps my mood high. Plus, it just fits with the “I’ll be in a bikini at the beach in exactly one week” thought. (Which is not bad either). I had some cherry tomatoes on the balcony, added them to the haricots verts and corn, and voilà!

And this evening, eating this salad was like a flash of lightening. Why hasn’t anybody told me before that corn tastes so good with green beans?!? I did not know that! [Feel my indignation...]. So maybe you were aware of this fact, but if not, I will not be to blame for keeping the secret :

Haricot vert and corn summer salad
for 2

½ pound green beans
1 cup corn kernels (either fresh, shaved from the cob, or in a can)
1 cup cherry tomatoes half a romaine lettuce
2 oz. feta or goat cheese
3 Tbsp olive oil
2 Tbsp red wine vinegar
1 tsp Dijon mustard
1 Tbsp shallot, finely diced
1 Tbsp basil, chopped
salt & pepper

To prepare dressing, combine oil, vinegar, mustard and shallot, stirring with a whisk. Add salt and pepper to taste.

Cook the beans in boiling water, about 7 minutes. Drain and plunge in ice water to stop the cooking, then drain.
Place beans in a large bowl. Add torn romaine leaves, corn, feta and tomatoes. Drizzle with dressing.

Salade d'été aux haricots vert et au maïs
pour 2

250g de haricots verts
1 demi romaine
1 petite boite de mais
Une quinzaine de tomates cerises
50 g de feta émiettée

3 cuillères à soupe d'huile d'olive
2 cuillères à soupe de vinaigre de vin rouge
1 cuillère à café de moutarde
1 cuillère à soupe d'échalote finement émincée
1 cuillère à soupe de basilic ciselé
Sel et poivre

Préparez la vinaigrette en émulsionnant l'huile, le vinaigre et la moutarde. Rajoutez l'échalote et le basilic. Salez et poivrez à votre goût.

Faites cuire les haricots verts dans l'eau bouillante, environ 7 minutes à partir de la reprise d'ébullition. Egouttez les et passez les sous l'eau froide pour stopper la cuisson.
Dans un grand bol, mélangez les feuilles de salade, les haricots, le maïs, les tomates et la feta, et ajoutez la vinaigrette.


La suite, please

Where it all began... The Omiarie

By Mélanie, on Friday, July 25, 2008

So, here we are. A new food blog… Why? There are already so many of them!
Well, when I discovered some blogs last year, I started to read them. Like, everyday. And I realized just how much you could share with others. And so, before I could notice, I found myself imagining what I could say about this last recipe I was trying. Or sharing this great trick I just learned. And, as my desire for this blog grew bigger, I just had to overcome my doubts (ok, my fears). About my writing. About my English level. And about my technical abilities. Or, should I say, inabilities… And I’m going to give it a try.

There was one subject where I had no doubt : the first recipe I wanted to tell you about. It comes from my German grand-mother. She was the baker in the family, and I remember her in the kitchen, preparing all these wonderful things like Black Forest cake, Apple Pie or Quark Kuchen (oh yes, we’ll talk about those later!). I guess that’s where I caught my love of baking, so it was all natural to start where it all began…

Therefore, last week-end, I prepared this post and made an Omiarie, for the greatest joy of all the family. It’s not a fussy cake, with people filled with admiration for how beautiful it is, and for how much time it probably took you to make, so you probably won’t think about it for great occasions. In fact, it’s quite simple. But it’s sooo good, you just can’t stop eating it. It’s the most tender cake, but with a great variety of textures. At your first bite, the crust, contrasting with the chocolate-melt-in-the-mouth-glaze… The soft yellow cake. And more than anything, the sweet, and somewhat crunchy, hazelnut-cinnamon filling. It’s got brown sugar in it. I mean, brown sugar + cinnamon? Always a winning combination, right? And here, the little twist comes from the marzipan bits. Depending on their size, they become soft and sticky, or caramelizing with the sugar.

I’m just wondering why I don’t bake this more often… And actually, someone just gave me this great baking form, which is the best for this type of cake. Mmmm [intense thought]. Would be a shame not to use it ;-)

Oh, by the way, I wanted to write this blog in English, even though I know I’m going to make some grammatical errors, because some of the people I care a lot about do not read French. However, the recipes are sometimes more technical, so after the English version (with the cup system) you’ll find one in French (in grams).

Omiarie
For 16 people

I think it’s more intended for a sweet afternoon break, but it’s moist and complex enough so you could serve it as a dessert. And if you’ve got some leftovers (even better if a little dry), it will taste like heaven dunked in your morning coffee.

For the batter :
2 ¼ sticks butter
1 ½ cups sugar
2 to 3 eggs
1 teaspoon of vanilla extract
2 ¾ cups flour
2 tsp baking powder
7/8 cup whipping cream

For the hazelnut-cinnamon filling:
2/3 cup brown sugar
1 ¼ cups hazelnut powder
1 tsp cinnamon
1/3 cup almond paste or marzipan (if you can, buy the one with 50% almond, and not only 33%)

For the chocolate glaze (optional):
2/3 cup dark chocolate

In the large bowl of an electric mixer fitted with paddle attachment, cream butter and sugar until light and fluffy, about 2 minutes. Add the eggs, one at a time, mixing well after each addition. Mix in the vanilla extract.
In a separate bowl, sift together flour and baking powder. With the mixer on low speed, add the flour to the batter. Use a rubber spatula to scrape down the sides of the bowl if needed.
Add the whipping cream, gradually increasing speed of the mixer as the liquid combines with the preparation. Beat at high speed for 5 minutes, the volume of the batter should increase.

In another bowl, combine brown sugar, hazelnut powder and cinnamon. Coarsely crumble the marzipan (it will be less sticky if you roll it in the hazelnut mixture while breaking it in small bits). Whisk well.

Preheat oven to 360°F.

Generously coat a bundt pan, preferably nonstick, with butter (or margarine). If you don't have any bundt pan, you could use 2 small loaf pan, or one angel food cake pan.

Pour one third of the batter into the prepared bundt pan. Sprinkle half of the hazelnut mixture, then another third of the batter, the rest of the hazelnut and finish with the batter. Gently swirl a fork through the batter in a up and down pattern in order to marble the cake.

Bake until tester inserted into center comes out with some moist crumbs still attached, about 1 hour. Cool cake in pan at least 30 minutes before inverting onto a rack to cool completely.

If you want to glaze the cake with chocolate, let cake stand at room temperature overnight. This way, the crust will be crunchier, in contrast to the chocolate.
Melt the chocolate (with 1 teaspoon water) in the microwave at lowest. Using a cooking brush, spread the glaze on the cake. Let cool 30 minutes before serving.

Bon appetit!

Omiarie

Pour la pâte:
250 g de beurre
1 paquet de sucre vanillé
300 g de sucre
2 - 3 œufs
350 g de farine
2 c. à café de levure
20 cl de crème liquide

Pour la garniture aux noisettes :
150 g de sucre brun
125 g de noisettes en poudre
1 c. à café de cannelle
30 g de pâte d'amande

Pour le glaçage au chocolat (optionnel) :
75g de chocolat noir, si possible de couverture

Dans le bol d’un mixer électrique, battez le beurre et les sucres jusqu’à obtention d’un mélange crémeux (environ 2 minutes). Ajoutez les oeufs un à un, en mélangeant bien après chaque pour bien les incorporer.
Mélangez la farine et la levure, et ajoutez les doucement à la préparation précédente, avec le mixer en position lente. Utilisez une spatule pour nettoyer les bords du bol si nécessaire.
Ajoutez la crème liquide en augmentant graduellement la vitesse du mixer. Laissez le batteur sur vitesse maximale pendant au moins 5 minutes, la préparation doit augmenter de volume.

Dans un autre bol, combinez le sucre brun, la poudre de noisette, la cannelle et la pâte d’amande grossièrement émiettée (elle collera moins si roulée dans la noisette lors de l’émiettement). Vous pouvez également la congeler de manière à la râper facilement.

Préchauffez le four à 180°.

Préparer le moule en le beurrant et farinant. Si vous n’avez pas de moule à Kougelhopf, vous pouvez utiliser un grand moule à cake (ou 2 petits, en réduisant le temps de cuisson).

Versez un tiers de la pâte dans le moule. Soupoudrez de la moitié de la garniture aux noisettes, puis d’un deuxième tiers de pâte, du reste de noisette et de pâte.
Pour marbrer le gâteau, mélangez délicatement à l’aide d’une fourchette, en faisant des vagues de bas en haut.

Enfournez pour environ 1 heure. La lame du couteau doit ressortir du gâteau avec quelques miettes dessus. Le gâteau doit rester moelleux. Laissez refroidir au moins 30 minutes avant de démouler et de laisser refroidir complètement.

Si vous voulez ajouter le glaçage au chocolat, c’est encore meilleur si l’omiarie est resté à l’air libre pendant plusieurs heures, de manière à former une croûte croustillante.
Faites alors fondre le chocolat au bain marie ou au micro-onde (dans ce cas, ajoutez une cuillère à soupe d’eau et utilisez la puissance minimale). Utilisez un pinceau pour répartir le chocolat sur le gâteau. Laissez le chocolat durcir avant de servir. La suite, please