Little pumpkins

By Mélanie, on Thursday, February 26, 2009


P1000929

A few weeks ago, I went to Stephane Martin’s restaurant with a friend, and I had the most amazing lava cake ever. As I told you, I’m not a huge fan of chocolate, and I’d rather have a fruit tart than… well, anything. This lava cake was made for me : not a chocolate one, as you would usually see (although they have one in the restaurant too, and they’re even renowned for it), but made with pumpkin. We spend the whole time wondering how to get the same result, this moist biscuit shell protecting a runny and sweet pumpkin cream (like a crème anglaise).

So we asked (if you know me, then you’ll know that this must have been very good, for me to ask something…). It’s supposed to be prepared exactly like a chocolate lava cake, but with pumpkin. Of course I tried to reproduce it, without success.

P1000925

So with the rest of the puree I made, I choose to stick with a safer choice. Some spices to remind the taste of a pumpkin pie, some ricotta for it’s mild flavour, and there you go : mini-cheesecakes! Who could say no to their gingerbread base? With their sizes and all the squash packed inside, you can even argue that they are good for you : the ricotta is there for calcium, eggs for the proteins, pumpkin for fibres and dietary minerals. Hum, maybe you wanna skip the sugar in this list… Hey, we all need some sweet moments in life…

Pumpkin and gingerbread cheesecakes
For 6 small cheesecakes

3 oz. gingerbread
2 Tbsp melted butter
2 eggs
1/2 cup sugar
1/2 cup ricotta cheese
1 cup canned pumpkin
1 teaspoon pumpkin spices

Preheat oven to 350°F.
Crumble gingerbread in your mixer. Stir with melted butter until moist clumps form. Press cookie mixture firmly onto bottom of 6 mini-pans.Bake crust until firm and beginning to darken, about 10 minutes. Cool crust.

Beat eggs, ricotta and sugar in large bowl until smooth. Beat in pumpkin and spices until just blended. Pour batter over crust in pans. Place the 6 pans in large roasting pan. Add enough hot water to come halfway up sides of pans. Bake cakes uncovered until filling is puffed around edges and moves slightly in center when pan is gently shaken, about 35 to 40 minutes.
Remove pan from water, let cool. Place hot cheesecake uncovered in refrigerator overnight before serving.


Petits cheesecakes épicés au potiron
Pour 6 petits gateaux

100g de pain d'épice
2 cuillères de beurre fondu
2 œufs
120g de sucre
100g de ricotta
150g de potiron cuit et réduit en purée
1 cuillère de 4 epices

Préchauffez le four à 170°.

Reduisez le pain d'épice en miettes dans un hachoir. Ajoutez le beurre fondu pour obtenir une pâte un peu collante. Repartissez au fond de vos ramequins et pressez bien au fond avec les doigts. Faites cuire 10 minutes et laissez refroidir (sinon vos ramequins risquent de se casser lorsque vous verserez le mélange froid dedans).

Dans un bol, fouettez les oeufs avec le sucre jusqu'à ce que le mélange blanchisse. Ajoutez la ricotta, puis le potiron et les épices, et mélangez bien. Versez la préparation dans les ramequins , et placez les dans un grand plat à rotir. Remplissez le plat d'eau de manière à atteindre la moitié de la hauteur des ramequins. Remettez au four et faites cuire 35 à 40 minutes.

Laissez refroidir les cheesecakes en dehors du bain marie et mettez les au frigo pour la nuit avant de servir.

La suite, please

Cake or bonbons, yours to choose

By Mélanie, on Monday, February 16, 2009

P1000733

Like for a lot of people, February seems to have won over me : after one week of fighting against the headache, I think a virus stoke back yesterday, when I didn't except it. I feel dizzy and my head is so heavy I wonder how it stands up on my neck, so no wonder my time out of the office is spent… in my bed, and not in the kitchen! However, since it’s already been one week, I thought I could make you wait with some chocolate.

P1000711

The recipe is quite basic, a one-bowl chocolate cake, and simply upgraded with some candied orange peels. It tastes like orangettes, but with the smooth texture of a chocolate fondant. Like a bonbon, worthwhile of a party, but less time consuming…
So, a quick note for a quick recipe, but this cake will quickly disappear too!


Orangette Chocolate cake

2 oz. candied orange peels
1 ½ stick butter
2/3 cup sugar
3 large eggs
5.5 oz. bittersweet chocolate
1/3 cup flour

Decoration (optional)
2 oz. bittersweet chocolate
1 oz. candied orange peels

Preheat oven to 375° F, and butter an 8-inch round cake pan.
Finely chop the candied orange peels.
Beat the butter with the orange until creamy, about 3 minutes. Add the sugar, then add the eggs one by one, stirring well after each addition.
Melt chocolate in a double boiler or in the microwave and add to the butter-egg mixture. Whisk well before adding the flour.
Pour batter into the buttered cake pan and bake for approximately 25 minutes, or until the center of the cake looks set and the top is crackled.
Let the cake cool in its pan on a rack for 10 minutes; then carefully turn the cake out of the pan and revert it, so that the crackly side is facing upward. Allow to cool completely. The cake will deflate slightly as it cools.

If you wish so, you can glaze the cake with melted chocolate and pieces of candied orange peels as in the picture.

Gâteau au chocolat façon orangette

50 g d’écorces d’oranges confites
150g de beurre à température ambiante
120g de sucre
3 œufs
150g de chocolat
40g de farine

Décoration (facultative)
50g de chocolat noir
25g d’écorces d’oranges confites

Préchauffez le four à 180°.
Hachez les écorces d’oranges.
Crémez le beurre avec les écorces d’orange en battant pendant plusieurs minutes. Ajoutez ensuite le sucre, puis les œufs, un à un, en battant après chaque addition.
Faites fondre le chocolat dans une casserole au bain marie, ou dans le micro-ondes (ajoutez 1 cuillère à soupe d’eau et faites fondre sur une puissance de 500W max).
Ajoutez le chocolat fondu et fouettez jusqu’à obtenir un mélange homogène, puis rajoutez la farine, sans trop mélanger cette fois.
Versez votre préparation dans un moule à manqué beurré et fariné, et faites cuire 25 minutes. Laissez refroidir avant de démouler.

Si vous le souhaitez, vous pouvez glacer le gâteau avec du chocolat fondu et le décorer de morceaux d’oranges confites.
Pour tempérer le chocolat simplement, je ne mets que la moitié du chocolat dans un bain marie. Dès que le chocolat est fondu (et donc à environ 55°), je le retire du feu, et je rajoute le reste des carrés. Il suffit de mélanger à la cuillère jusqu’à ce que tout soit fondu (ce rajout a fait baisser la température).


La suite, please

Valentine's day...

By Mélanie, on Saturday, February 14, 2009

La suite, please

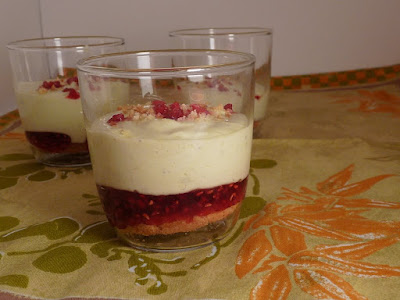
Quick raspberry trifle

By Mélanie, on Tuesday, February 3, 2009

Big confession : sometimes, I don't want to hear anything about food. I don't want to spend hours in the kitchen, whisking, mesuring, rolling (ok, that's pretty unusual. In a normal state of mind, this only evocation would look like fun to me!), cleaning the dishes (and that's the constant part...).
I was in this lazy mood last time I had friends over for dinner, but I still wanted to serve them something good and (at least partially) homemade. So I cheated, and used some store-bought cookies, and very common ingredients.
I've learned that that’s ok to keep it simple. Maybe you'll be lazy too, or in a hurry, and you’ll be glad to have this dessert ready in 10 minutes (no cheating in this time approximation, I swear).


6 shortbread cookies – pure butter, like those. Or, if you want to make them, here is the recipe.
8 Tbsp raspberry preserves
2.8 oz. raspberries, fresh or frozen
6 oz. mascarpone
2 eggs
3 Tbsp + 1 teaspoon sugar
½ tsp pistachio paste

Put a shortbread cookie in each glass.
Save 6 raspberries for the decoration and divide the rest into the glasses, along with the preserve.
Combine egg yolks and sugar and whisk until pale and thick, about 2 minutes. Stir in mascarpone and pistachio paste and whisk firmly until smooth.
In a separate bowl, whisk the egg whites until they have firm peak. Fold the egg whites into the mascarpone mixture using a large rubber spatula (carefully lift cream from the bottom of the bowl and pull it over the top, turning the bowl and repeating this until no foam remains visible). Divide cream between the 6 glasses, over the raspberries.
Sprinkle with shortbread crumbs and one raspberry, and refrigerate for 1 hour before serving.

Verrine framboise pistache
Pour 6 personnes

6 sablés bretons
8 cuillères à soupe de confiture de framboise
80g de framboises
175g de mascarpone
2 œufs
40g de sucre
½ cuillère à café de pâte de pistache

Placez un sablé breton dans le fond de chaque verre.
Réservez 6 framboises et répartissez ensuite le reste mélangé à la confiture.
Battez les 2 blancs en neige ferme. Dans un second bol, fouettez vigoureusement les jaunes avec le sucre jusqu’à ce que le mélange blanchisse. Ajoutez ensuite le mascarpone et la pâte de pistache en fouettant pour obtenir un mélange homogène. Incorporez ensuite délicatement les deux blancs à l’aide d’une spatule, en procédant en plusieurs fois. Versez cette crème dans chaque verrine, et laissez au réfrigérateur jusqu’au moment de servir. Décorez avec une framboise ou des miettes de sablé.
La suite, please

Hokkaido Squash Soup

By Mélanie, on Friday, January 30, 2009

P1000623

Do you remember when I told you I was very intrigued obsessed with winter squash? It seems to me it is the quintessential winter comfort food, putting you instantly in the right mood to enjoy the cold crisp air outside (and the warmth of your home). The possibilities are endless (galettes, salads, pies, risottos, etc…), and I’ve got so much to catch up!
So, as I attempted to cook for myself de bons petits plats (tasty little dishes), I naturally turned to the tempting Hokkaido squash at the farmer’s market. As long as making comfort food, why not going to the end of the concept, with a warm meal, simmered for hours… A SOUP. I know, I maybe watched Top Chef too much, and the continuous repetition of “Soup is good”, “Soup is love”, “Soup is the best test for a chef” finally totally brainwashed me, because I made my 4th soup in 2 weeks yesterday evening. Or I’m very cold. Or both actually…

P1000612P1000613

Anyway, when my guests asked for second helpings, I felt my mission was accomplished. And now, this is for you...

Roasted Hokkaido squash soup

1 2-pound Hokkaido squash peeled, seeded, chopped (about 1 pound once peeled and roasted)
1 celery stalk, chopped
½ onion, chopped
1 shallot
1 teaspoon oil
1 teaspoon coriander seeds
2 cups (or more) canned low-salt broth
Salt and pepper

Preheat oven to 400°F.
Roast squash, cut sides down, in an oiled roasting pan in middle of oven until tender, about 30 minutes. When cool enough to handle, scrape flesh from skin.
Heat oil in Dutch oven over medium-high heat. Add onions and shallots; cook until softened, about 2 minutes, before stirring in celery until tender. Add squash, broth and coriander seeds. Cover and simmer until pumpkin is very tender, about 20 minutes.
Purée soup in blender.
Season to taste with salt and pepper and serve.


Soupe au potimarron rôti

Le fait de rôtir le potimarron avant de le cuire à l’eau fait ressortir son goût de noisette, et permet un épluchage bien plus facile.
1 petit potimarron (environ 1kg entier – 500g de chair rôtie au four)
1 branche de céleri
½ oignon jaune
1 échalote
1 cuillère à café d’huile
1 cuillère de graines de coriandre
50 cl d’eau
1 bouillon cube dégraissé
Sel et poivre

Préchauffez le four à 200°.
Coupez le potimarron en 2. Videz les graines, et posez le dans un plat à four, face découpée en bas, en ajoutant un fond d’eau. Faites rôtir le potimarron pendant environ 30 minutes, jusqu’à ce que la chair soit tendre.
Pendant ce temps, émincez finement l’oignon, l’échalote et le céleri. Faites chauffer l’huile dans un fait-tout sur feu vif-moyen. Une fois chaude, versez-y les oignons et échalotes et faites revenir 2 mn avant d’ajouter le céleri. Baissez le feu, et laissez cuire.
Creusez la courge avec une cuillère et placez les avec les oignons, la coriandre et le bouillon-cube dans la casserole. Couvrez d'eau aux deux-tiers, et portez à ébullition.
Posez un couvercle et laissez cuire 20 mn à feu moyen.
Passez ensuite au mixer et rectifiez l'assaisonnement en sel et poivre.
La suite, please

A sweet new start with tiramisu tartlets

By Mélanie, on Sunday, January 25, 2009

Well…. Ahem…[akward moment]… Hi everyone!..?
tartisu

I’m so sorry I was absent for almost 2 months… Explaining my silence and the different phases I went through would be booooring, but let just say it involved many cookies and other sorts of meals, to bake and to eat! So much that I actually thought I’d never want to be in a kitchen again. Yes, that much!
I needed to rest (and to lose weight) and believed I could live on fat free yogurt and skim chicken forever (ok, at least for a few months). But who am I kidding? Cooking is what I love to do. I love the sound of the knife on the cutting board. I love to imagine what taste two ingredients would have together. I need to put my love and care into something others will enjoy. And therefore, this is what I’m going to do this year. My challenge will be to do the same when it’s only me sitting at the table. This means more healthy dishes to share with you. Would you be interested?

This is what I’m wishing for this new year, and what I wish you too : success in obtaining what you want and what you’re working for. And a year full of little moments of joy, smiles, surprises, laugher with friends and family. Making lots of sweet memories for the future. And for those of you who’ll have a life-changing year (moving in a new place, getting married, becoming a parent…) I just wish you all the possible happiness in this new adventure!

Now, enough with all these gooey thoughts, and let’s get back to the serious stuff. The tartlets! They actually are the one who made me go back into the kitchen. The idea formed into my head during a whole week, until I could not resist anymore before I tried them.
I wanted to obtain the taste of a tiramisu, but with the nice presentation of a one-plate dessert. I longed for the crispy, sandy texture of a tart crust, but still needed the moist and coffee taste from the “real” tiramisu. This is why there is an almond soft cake imbibed with coffee syrup, over the chocolate flavored crust. The whole is topped with a light mascarpone mousse, dusted with Dutch cocoa. Another advantage is that it avoids the raw eggs usually used… The result was beautiful, and quite a different sensation than for a tiramisu, but packed with all the good flavors!

Tartamisu
For 6 4-inches tartlets

For the tart crust
6 Tbsp butter, room temperature
1 egg yolk
½ cup + 1 Tbsp confectioner sugar
1/8 cup almond powder / flour
1/3 cup + 1Tbsp flour
2 Tbsp cocoa
1 pinch salt

For the almond - coffee soft cake
1 egg white
¼ cup almond powder
2 Tbsp instant coffee powder in 2 Tbsp boiling water
1/8 cup melted butter
1/8 cup + 1 tsp sugar

For the mascarpone mousse
2 Tbsp milk
1 tsp gelatin + 1 Tbsp water
20 cl heavy cream
3.5 oz. mascarpone
¼ cup sugar
2 Tbsp cocoa

Prepare the pie dough :
First mix almond powder and confectioner sugar. Add cocoa, flour and salt. Add the butter and pulse for a few seconds, until the dough resembles coarse crumbs. It is very important not to mix the dough too long. Mix in the egg yolk and, with your hand palm, press the dough about 3 times, just until it forms a ball that holds together. Flatten into a disk and wrap in plastic wrap and refrigerate at least 1 hour and up to 1 day.
Preheat oven to 340°F.
Roll out dough into a on a floured surface with a floured rolling pin. Cut out 6 (5-inch) rounds and fit each round into a tartlet mold. Prick bottoms all over with a fork and bake 15 minutes.

In a large bowl, combine sugar, almond powder, melted butter and half of the coffee. In another bowl, beat egg white until it forms soft peaks. Fold white in the almond-coffee mixture with a rubber spatula. Pour over the baked pie crust and bake 15 to 20 minutes.
Transfer tartlets to rack; cool completely.
Using a brush, moisten the almond cake with remaining coffee.

Prepare the mascarpone mousse :
Sprinkle the gelatin over the water, stir and let sit to bloom. In a large mixing bowl, whisk the mascarpone with the sugar. Heat the milk and add gelatin so that it melts. Quickly whisk it in the mascarpone batter. Whip the heavy cream to stiff peaks, and fold into the mascarpone.
Place it in a piping bag fitted with a large star tip and pipe mascarpone mousse on top of the tartlets. Sprinkle with cocoa and let sit in the fridge for a minimum of 2 hours.

Tartamisu

Pour 6 tartelettes de 11 cm

Pour la pâte sablée :
75g de beurre à température ambiante
1 jaune d’œuf
85g de farine
15g de cacao
60g de sucre glace
20g d’amande en poudre
1 pincée de sel

Pour le fondant café
1 blanc d’œuf
50g de poudre d’amande
2 cuillères à soupe de café instantané diluées dans 2 cuillères d’eau bouillante
25g de beurre fondu
30g de sucre

Pour la mousse mascarpone
2 cuillères à soupe de lait
2g (1 feuille) de gélatine
20cl de crème liquide
100g de mascarpone
45g de sucre
2 cuillères à soupe de cacao

Préparez la pâte à tarte :
Mélangez d'abord le sucre glace, les amandes en poudre, la farine, le sel et le cacao. Ajoutez le beurre et mélangez quelques secondes, le temps de former une pâte grumeleuse. Incorporez le jaune d'œuf. Il ne faut pas trop travailler la pâte. Fraisez (c’est l’action de travailler avec la paume de la main) rapidement et formez 1 boule de pâte. Aplatissez et enveloppez ce disque dans un film plastique pour reposer au frais pendant au moins 1 heures.
Préchauffez le four à 170°.
Farinez abondamment le plan de travail ainsi que le rouleau à pâtisserie, puis étalez la pâte sur 2 à 3 mm d'épaisseur. A l’aide d’un verre d’un diamètre légèrement supérieur à vos moules, découpez des disques dans la pâte. Foncez les moules avec ces disques et mettez à cuire 15 minutes.

Mélangez dans un bol le sucre, les amandes, le beurre fondu et la moitié du café. Dans un deuxième bol, battez le blanc en neige ferme, puis incorporez le délicatement au mélange d’amandes. Utilisez pour cela une spatule souple : il ne faut pas tourner autour du saladier, mais de haut en bas en inclinant celui-ci.
Versez cette préparation sur les fonds de tartelettes et remettez au four pour 15 à 20 minutes.
Laissez refroidir, puis, à l’aide d’un pinceau, imbibez le biscuit du café restant.

Préparez la mousse de mascarpone :
Laissez la feuille de gélatine ramollir dans un bol d’eau froide.
Battre ensemble le mascarpone et le sucre afin d'obtenir un mélange homogène.
Égouttez la gélatine et ajoutez-la au lait chaud pour qu’elle fonde. Versez-la ensuite rapidement sur le mascarpone tout en fouettant pour l’incorporer.
Fouettez la crème en chantilly et incorporez-la au reste délicatement.
Utilisez une poche à douille pour répartir la mousse sur chaque tartelette de manière décorative. Saupoudrez de cacao et laissez au réfrigérateur pour au moins 2 heures avant de servir.
La suite, please

About Nutella, or how to be deified by chocolate addicts

By Mélanie, on Tuesday, December 9, 2008

With all that time of silence, I could have come back with a long post. Apologizing for missing Thanksgiving and the preparation of Christmas cookies (and partly blaming work, health, and all those stuff that continue to keep me busy). Telling you about my wonderful week-end in London, trying to resist to the omnipresence of Christmas cookbooks. I still don’t know if the 3 books I carried in my backpack are a proof that I succeed or failed…. To my discharge, one of them was planned (and searched… in 5 libraries! So I will make sure to use Anita’s Field Guide to Cookies a lot as soon as the Christmas holidays start).

The thing is, since I’m no good at writing, it would have been even longer before I’d give you this new recipe. And, after seeing the tart disappear in less than 5 minutes, and being addressed by a group of 4 people with a “You made the nutella tart? It’s amazing! Can I have the recipe please?” I sort of understood this was urgent.

See, I made it for Juliette’s birthday, because I always get confused about the fruits she likes and doesn’t. But I have very clear memories of the many holidays we spent in Bretignolles. Breakfast with a gache vendéenne and nutella has always been part of it, so I was pretty sure she’d also enjoy the tart. It is creamy and crunchy thanks to the hazelnuts, but mostly rich and chocolaty, so that a simple bite brings you total satisfaction. Apparently, everyone thought so…


From Pierre Hermé

1 disk of sugar dough for the tart shell (here or there)
7 oz. nutella
5 oz. bittersweet chocolate
1 cup (2 sticks) butter
1 egg
3 yolks
2 Tbsp sugar
5 oz. Coarsely chopped hazelnuts

Preheat oven to 350°F.

Roll the disk of dough into an 12-inch circle, 1/4-inch thick, on a lightly floured surface. Line a 10-inch pie pan, leaving a 1-inch overhang.
Line shell with foil and fill with pie weights. Bake until edge is pale golden, about 12 minutes.
Spread nutella over bottom of the tart shell.
Stir chocolate and butter in heavy medium saucepan over low heat until melted and smooth. Remove from heat. Cool to lukewarm, stirring often. Stir the egg and yolks one into melted chocolate, one at a time. Whisk slowly, starting at the center and slowly working your way out in concentric circles until you have a smooth, shiny mixture. Finally incorporate sugar.
Pour filling into cooled crust, over the nutella. Sprinkle with chopped hazelnuts and bake until filling is set about 3 inches from edge but center is still wobbly, 11 minutes at 360°F. (Center will continue to set as tart cools.) Partly cool in pan on rack, about 30 minutes, before serving. This is also very good at room temperature.


Tarte au Nutella
De Pierre Hermé

1 fond de tarte sucrée (ici ou )
200g de nutella
140g de chocolat noir
200g de beurre
1 œuf
3 jaunes
2 cuillères à soupe de sucre
140g de noisettes grossièrement hachées

Préchauffez le four à 180°.

Farinez abondamment le plan de travail ainsi que le rouleau à pâtisserie, puis étalez la pâte sur 2 à 3 mm d'épaisseur.
Etalez le disque de pâte en un cercle légèrement plus grand que votre moule à tarte (la recette a été réalisée avec un moule de 27cm). Foncez votre moule (beurré et fariné) avec la pâte et faites la précuire 12 minutes au four.

Tartinez le fond de la tarte avec le nutella. Réservez au frais.

Faites fondre le chocolat avec le beurre. Laissez refroidir légèrement (jusqu’à environ 40°). Incorporez délicatement l’œuf au chocolat. Utilisez une maryse pour éviter d’incorporer de l’air dans la ganache. Incorporez ensuite les jaunes un à un, puis le sucre.

Versez la ganache sur le nutella dans le fond de la tarte, et parsemez de noisettes grillées.
Faites cuire la tarte 11 minutes à 190°, juste assez pour que les bords soient fermes et le centre encore tremblotant.
Laissez refroidir dans le moule, environ 30 minutes, et servez tiède ou à température ambiante.
La suite, please